Manage Windows based Zoom Rooms with Workspace ONE

Step by step guide to deploying and managing Zoom Rooms on Windows using Workspace ONE UEM
1. Overview
Zoom Rooms provide a dedicated meeting room experience by transforming a Windows device into a purpose built collaboration endpoint. While Zoom offers its own management portal for application settings and room configuration, organisations still need a way to manage the underlying Windows operating system, security settings, and application lifecycle.
Workspace ONE provides a modern management framework for Windows based Zoom Rooms, enabling administrators to deploy devices, automate configuration, manage updates, and monitor compliance from a central console.
In this article, we’ll walk through the key steps required to onboard and manage Windows based Zoom Rooms using Workspace ONE.
2. Device Enrolment
Before deploying Zoom Rooms, it is important to determine how devices will be enrolled into Workspace ONE.
For new devices, I recommend leveraging Windows Autopilot to automate provisioning and enrolment. This approach allows devices to be shipped directly to site and automatically configured during the out-of-box experience.
If you are new to Autopilot and Workspace ONE, review my previous blog post to setup the base of your autopilot config.
2.1 Entra ID device group
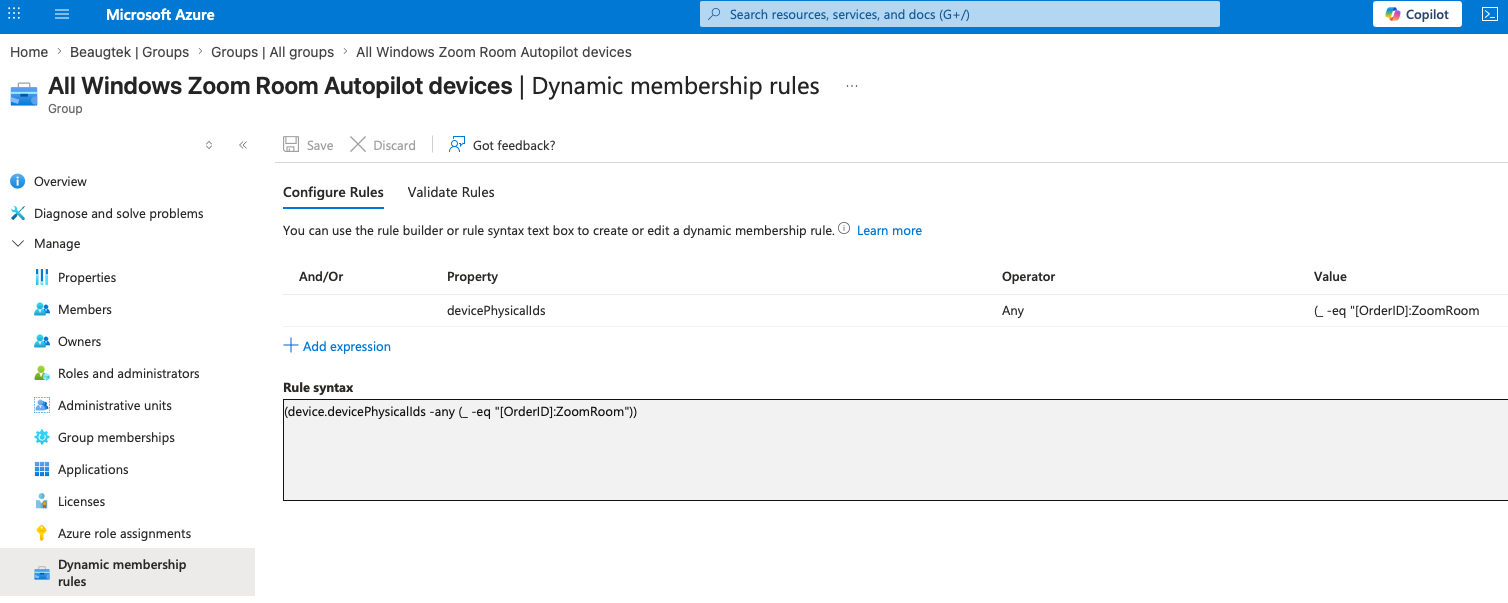
Create an Entra ID dynamic device group to automatically include all Windows based Zoom Room devices that are Autopilot registered in your tenant. This group will later be used to assign the Autopilot deployment profile.
- Log in to your Entra ID tenant - https://portal.azure.com
- Navigate to Entra ID > Manage > Groups
- Create a new group
- Group type: Security
- Group name: All Windows Zoom Room Autopilot devices
- Group description: Security group containing all Windows based Zoom Room Autopilot devices
- Microsoft Entra roles can be assigned to the group: No
- Membership type: Dynamic Device
- Rule syntax:
(device.devicePhysicalIds -any (_ -eq "[OrderID]:ZoomRoom"))
2.2 Autopilot profile
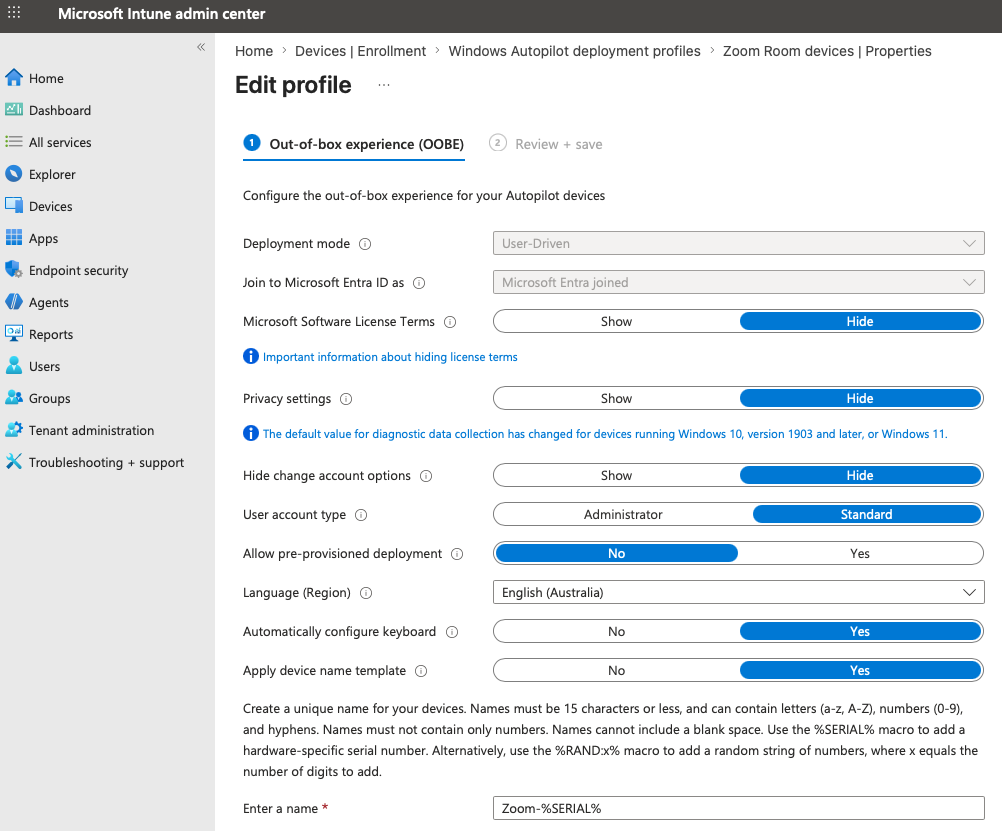
Now it’s time to create and assign the Autopilot deployment profile.
- Log in to your Intune tenant - https://intune.microsoft.com
- Navigate to Devices > Device onboarding > Enrollment > Windows > Windows Autopilot
- Select Deployment profiles
- Click Create profile
- Configure the profile according to your requirements
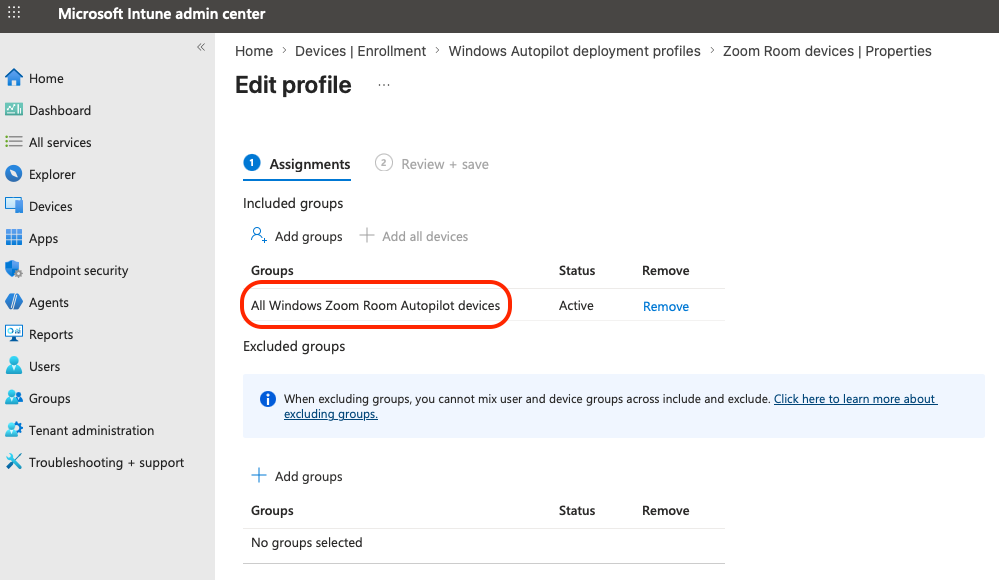
- Assign the profile to the Entra ID device group created in the previous step
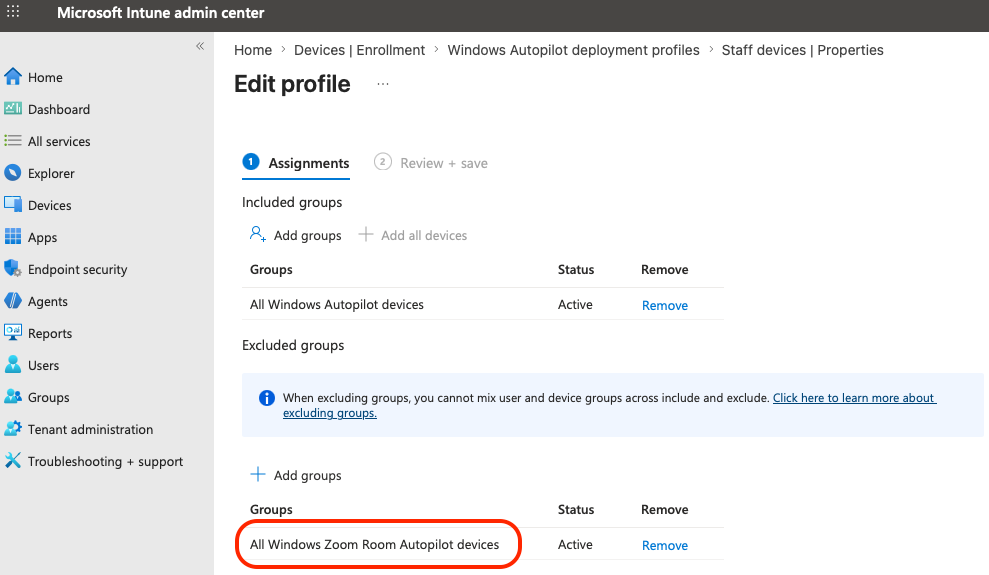
- If you have another Autopilot profile that includes all your Autopilot devices, make sure to exclude the Zoom Room group from this profile to avoid conflict.
- Configure the profile according to your requirements
2.3 Autopilot devices
As devices are registered by your OEM, they will automatically appear in the Windows Autopilot devices list. To ensure Zoom Room devices are automatically added to the Entra ID dynamic device group created earlier, they must be assigned the appropriate Group tag.
To tag you Zoom Room devices:
- Log in to your Intune tenant - https://intune.microsoft.com
- Navigate to Devices > Device onboarding > Enrollment > Windows > Windows Autopilot
- Select Devices
- Locate the devices that will be used as Zoom Rooms and assign the
ZoomRoomGroup tag. 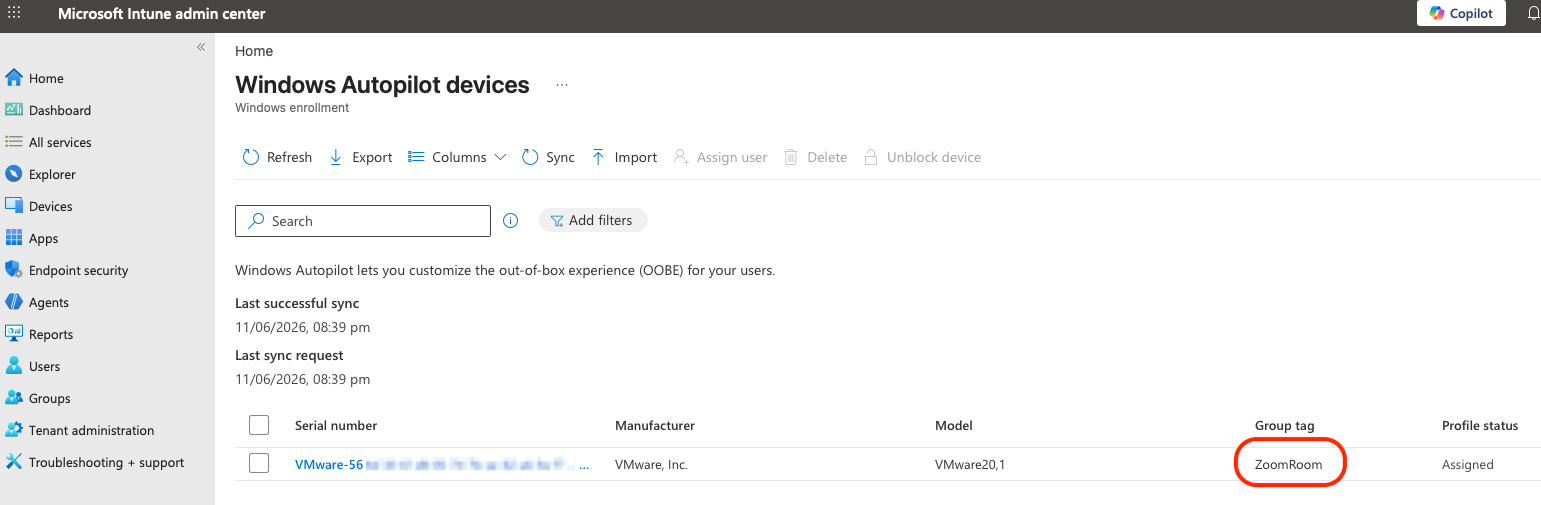
3. Workspace ONE configuration
3.1 Organisation group
Consider creating a dedicated Organization Group (OG) for Zoom Rooms devices. Benefits include:
- Dedicated application assignments
- Separate compliance policies
- Simplified reporting
- Granular administrator delegation
- Easier lifecycle management
3.2 Service account
Zoom Rooms devices are typically shared endpoints and should be managed using a device-centric management model rather than a user-centric. However, Workspace ONE requires a user account to complete the enrolment process.
A common approach is to create a dedicated service account (for example, zoomroom@yourdomain.com) and use it to enrol all Zoom Rooms devices.
3.3 Removing bloatware
Windows includes several pre-installed applications that provide little value on a dedicated Zoom Room endpoint. To automatically remove unnecessary applications and streamline the operating environment, I recommend reviewing my previous blog article.
3.4 Applications deployment
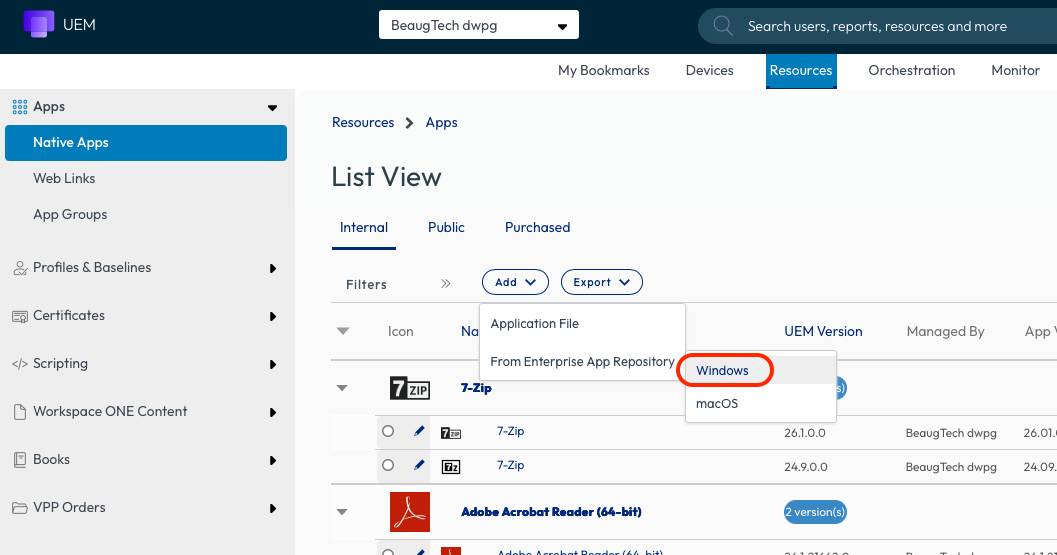
Use Workspace ONE to deploy and manage the applications required on your Zoom Rooms devices. Where possible, I recommend leveraging the Enterprise Application Repository (EAR) first, as it can significantly simplify application deployment and ongoing patch management by providing pre-packaged and vendor-maintained applications.
The specific applications you deploy will vary based on your requirements and room hardware, but common examples include:
- Zoom Rooms
- Workspace ONE Assist
- Endpoint Detection and Response (EDR) solutions
- Security and monitoring tools
Depending on your room hardware and peripherals, you may also need to deploy:
- Audio drivers
- Camera drivers
- Touch panel software
- Display management utilities
- Vendor-specific applications
3.5 Local account with auto logon
Create a Windows local standard account that will then auto logon making the device ready to use once booted.
Note: Auto logon requires the account password to be stored locally on the device. Ensure the account has only the minimum permissions required and is used exclusively for Zoom Room operation.
- Log in to your Workspace ONE UEM tenant.
- Navigate to Resources > Scripting > Scripts
- Create a Windows Script
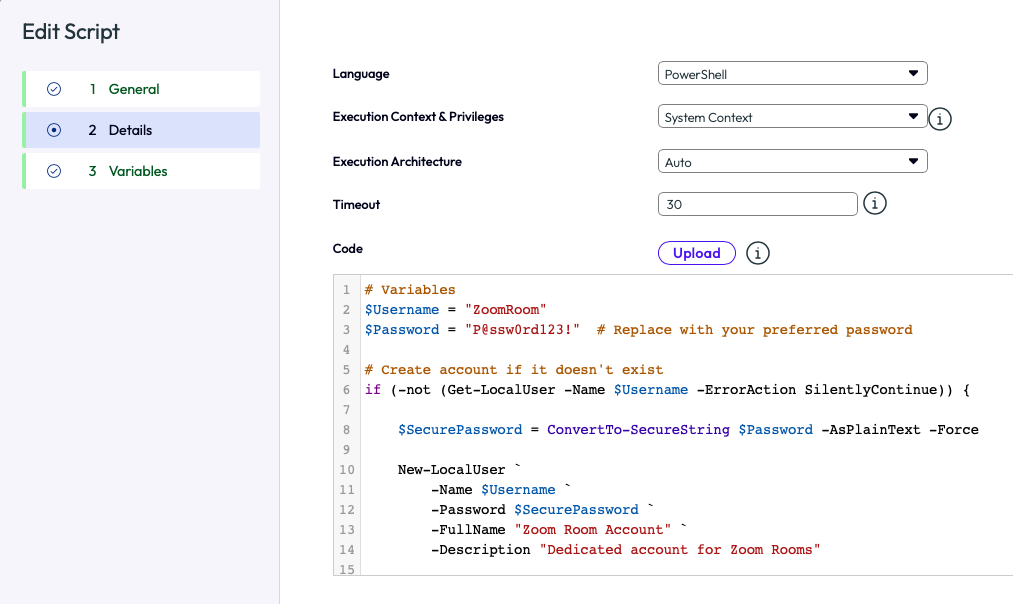
- Name: Windows - ZoomRoom - local account
- Run: System context
- Paste the below script
-
# Variables
$Username = "ZoomRoom"
$Password = "P@ssw0rd123!"  # Replace with your preferred password

# Create account if it doesn't exist
if (-not (Get-LocalUser -Name $Username -ErrorAction SilentlyContinue)) {

    $SecurePassword = ConvertTo-SecureString $Password -AsPlainText -Force

    New-LocalUser `
        -Name $Username `
        -Password $SecurePassword `
        -FullName "Zoom Room Account" `
        -Description "Dedicated account for Zoom Rooms"

    Add-LocalGroupMember -Group "Users" -Member $Username

    # Disable password expiry
    Set-LocalUser -Name $Username -PasswordNeverExpires $true
}

# Configure auto logon
$WinlogonKey = "HKLM:\SOFTWARE\Microsoft\Windows NT\CurrentVersion\Winlogon"

Set-ItemProperty -Path $WinlogonKey -Name "AutoAdminLogon" -Value "1"
Set-ItemProperty -Path $WinlogonKey -Name "DefaultUserName" -Value $Username
Set-ItemProperty -Path $WinlogonKey -Name "DefaultPassword" -Value $Password
Set-ItemProperty -Path $WinlogonKey -Name "ForceAutoLogon" -Value "1"
Set-ItemProperty -Path $WinlogonKey -Name "DefaultDomainName" -Value $env:COMPUTERNAME
-
- Assign the Script to your Zoom Room OG
- Trigger: Run Once Immediately
3.6 Zoom Room auto launch
To provide a seamless meeting room experience, the Zoom Rooms application should start automatically after the device boots and the Zoom Room account signs in. This can be achieved by creating a startup entry for the Zoom Rooms executable.
- Log in to your Workspace ONE UEM tenant.
- Navigate to Resources > Scripting > Scripts
- Create a Windows Script
- Name: Windows - ZoomRoom - auto launch
- Run: System context
- Paste the below script
-
# Possible Zoom Rooms locations
$ZoomPaths = @(
    "C:\Program Files\ZoomRooms\bin\ZoomRooms.exe",
    "C:\Program Files (x86)\ZoomRooms\bin\ZoomRooms.exe"
)

# Find installed executable
$ZoomExe = $ZoomPaths | Where-Object { Test-Path $_ } | Select-Object -First 1

if (-not $ZoomExe) {
    Write-Host "Zoom Rooms executable not found."
    exit 1
}

# Create startup entry
$RunKey = "HKLM:\SOFTWARE\Microsoft\Windows\CurrentVersion\Run"

New-ItemProperty `
    -Path $RunKey `
    -Name "ZoomRooms" `
    -Value "`"$ZoomExe`"" `
    -PropertyType String `
    -Force

Write-Host "Zoom Rooms startup entry configured."
-
- Assign the Script to your Zoom Room OG
- Trigger: Startup
3.7 Security controls
Although Zoom Rooms are dedicated collaboration endpoints, they should still comply with your organisation’s security standards. Restricting access to the underlying Windows operating system helps reduce the attack surface and prevents users from making unintended configuration changes.
Recommended controls include:
- Log in to your Workspace ONE UEM tenant.
- Navigate to Resources > Profiles & Baselines > Profiles
- Create a Windows ADMX profile with Device context
- Enable BitLocker
- BitLocker Drive Encryption > Operating System Drives > Require additional authentication at startup = Require TPM
- BitLocker Drive Encryption > Operating System Drives > Enforce drive encryption type on operating system drives
- Disable Windows Hello
- Windows Hello for Business > Use Windows Hello for Business = Disabled
- Restrict Settings access
- Control Panel > Settings Page Visibility
showonly:network-wifi;bluetooth;windowsupdate;windowsupdate-action;display- Settings list: Link
- Control Panel > Settings Page Visibility
- Disable USB storage
- Removable Storage Access > All Removable Storage classes: Deny all access
- Disable lock screen
- Control Panel - Personalization > Do not display the lock screen
- Disable Search
- Search > Allow Cortana = Disabled
- Search > Configures search on the taskbar
- Search on the taskbar: Hide
- Disable notifications
- Start Menu and Taskbar > Notifications > Turn off toast notifications
- Start Menu and Taskbar > Notifications > Turn off notification network usage
- Enable Location Services
- App Privacy > Let Windows apps access location
- Default for all apps: Force Allow
- App Privacy > Let Windows apps access location
- Enable BitLocker
- Set the timezone automatically
- Navigate to Resources > Scripting > Scripts
- Create a Windows Script
-
Set-ItemProperty -Path HKLM:\SYSTEM\CurrentControlSet\Services\tzautoupdate -Name Start -Value "3" Start-Service tzautoupdate - Assign the Script to your Zoom Room OG
- Trigger: Run Once Immediately
Note: A lot of those settings are also available in the templated baselines in Workspace ONE (ie. CIS level 1), though a lot of the pre-set settings will be conflicting with the local account and auto logon that we created earlier, so you will need to remove some of the pre-set settings if you want to use those templates.
3.8 Power management
Configure Workspace ONE Windows power management profiles to prevent the device from sleeping or hibernating during inactive hours.
- Log in to your Workspace ONE UEM tenant.
- Navigate to Resources > Profiles & Baselines > Profiles
- Create a Windows ADMX profile with Device context
- Enable High Performance Power
- Power Management > Select an Active Power Plan
- Disable sleep menu
- File Explorer > Show hibernate in the power options menu = Disabled
- File Explorer > Show sleep in power options menu = Disabled
- Never Sleep
- Power Management > Sleep Settings > Specify the system sleep timeout (plugged in) = 0 (Never)
- Disable sleep
- System > Power Management > Sleep Settings > Allow standby states (S1-S3) when sleeping (plugged in) = Disabled
- Never Turn Off Display
- Power Management > Video and Display Settings > Turn off the display (plugged in) = 0 (Never)
- Enable High Performance Power
In addition, ensure BIOS/UEFI settings such as Wake-on-LAN and AC Power Recovery are enabled so devices automatically recover following a power outage. If supported by your hardware vendor, consider configuring these settings remotely through the vendor management platform rather than manually on each device.
3.9 Windows Updates
Workspace ONE can be used to manage Windows Update for Business, allowing administrators to keep those devices up to date.
- Log in to your Workspace ONE UEM tenant.
- Navigate to Resources > Profiles & Baselines > Profiles
- Create a Windows ADMX profile with Device context
- Windows Update > Legacy Policies > Always automatically restart at the scheduled time = Enabled
- Windows Update > Manage end user experience
- Configure Automatic Updates: Enabled
- Configure automatic updating: 4 - Auto download and schedule the install
- Schedule: Select an out of office hour
- Turn off auto-restart for updates during active hours: Enabled
3.10 Remote control
3.10.1 Workspace ONE Assist
Once Zoom Room devices are deployed, administrators need a reliable way to remotely troubleshoot and support them. Workspace ONE Assist provides remote screen control, remote shell access, file transfer capabilities, and other troubleshooting tools that allow support teams to quickly diagnose and resolve issues without requiring an onsite visit.
If you are licensed for Workspace ONE Assist, simply deploy the Assist application to your Zoom Room devices and the remote support capabilities will be available immediately.
3.10.2 Intel vPro
Remote support tools are extremely valuable, but what happens when Windows fails to boot or the device encounters a blue screen? This is where the Workspace ONE integration with Intel vPro can provide significant operational benefits.
Intel vPro enables out-of-band management, allowing administrators to remotely access and manage supported devices below the operating system layer. This makes it possible to power on devices, access the BIOS, perform recovery actions, and troubleshoot issues even when Windows is unavailable.
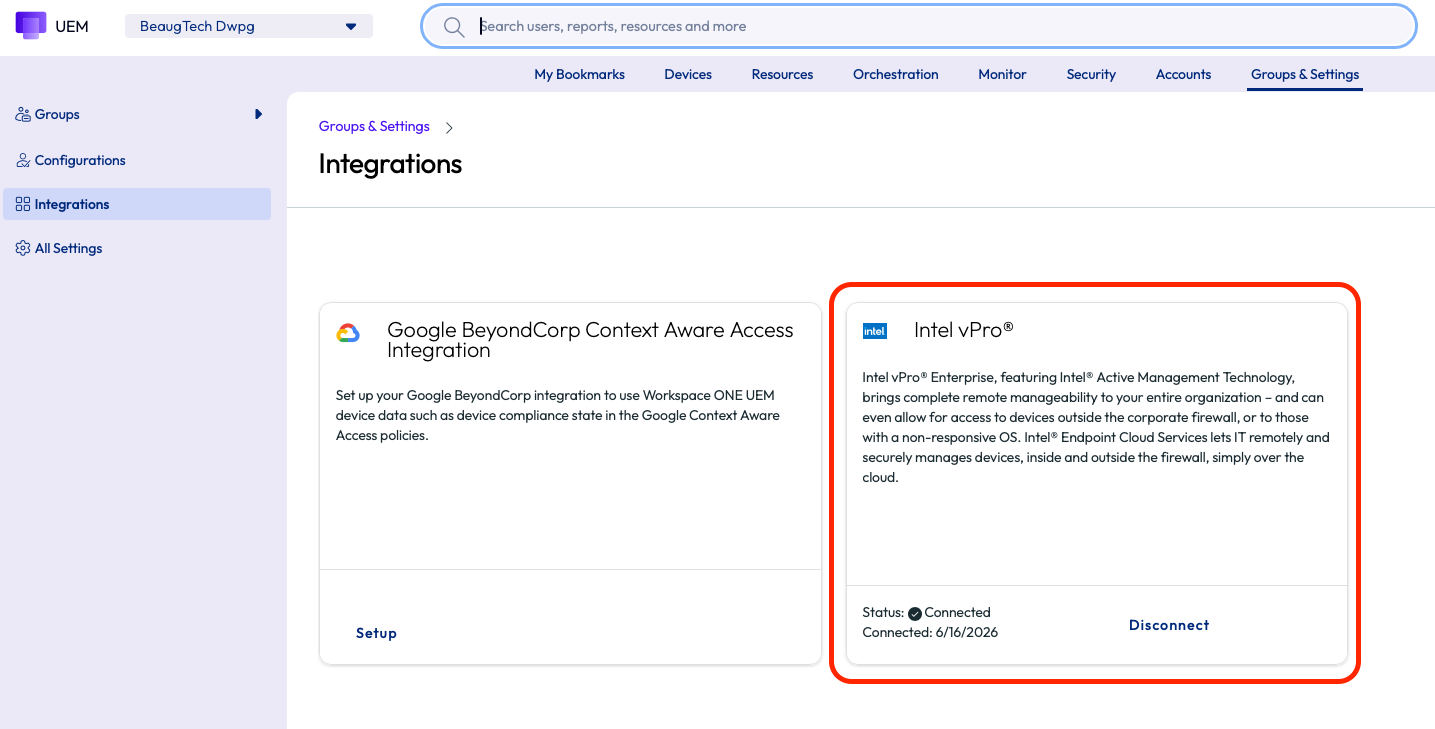
To integrate Intel vPro with Workspace ONE:
- Log in to your Workspace ONE UEM tenant.
- Navigate to Settings > Integrations > Intel vPro
- Navigate to Resources > Profiles & Baselines > Profiles
- Create a Windows Desktop profile with Device context
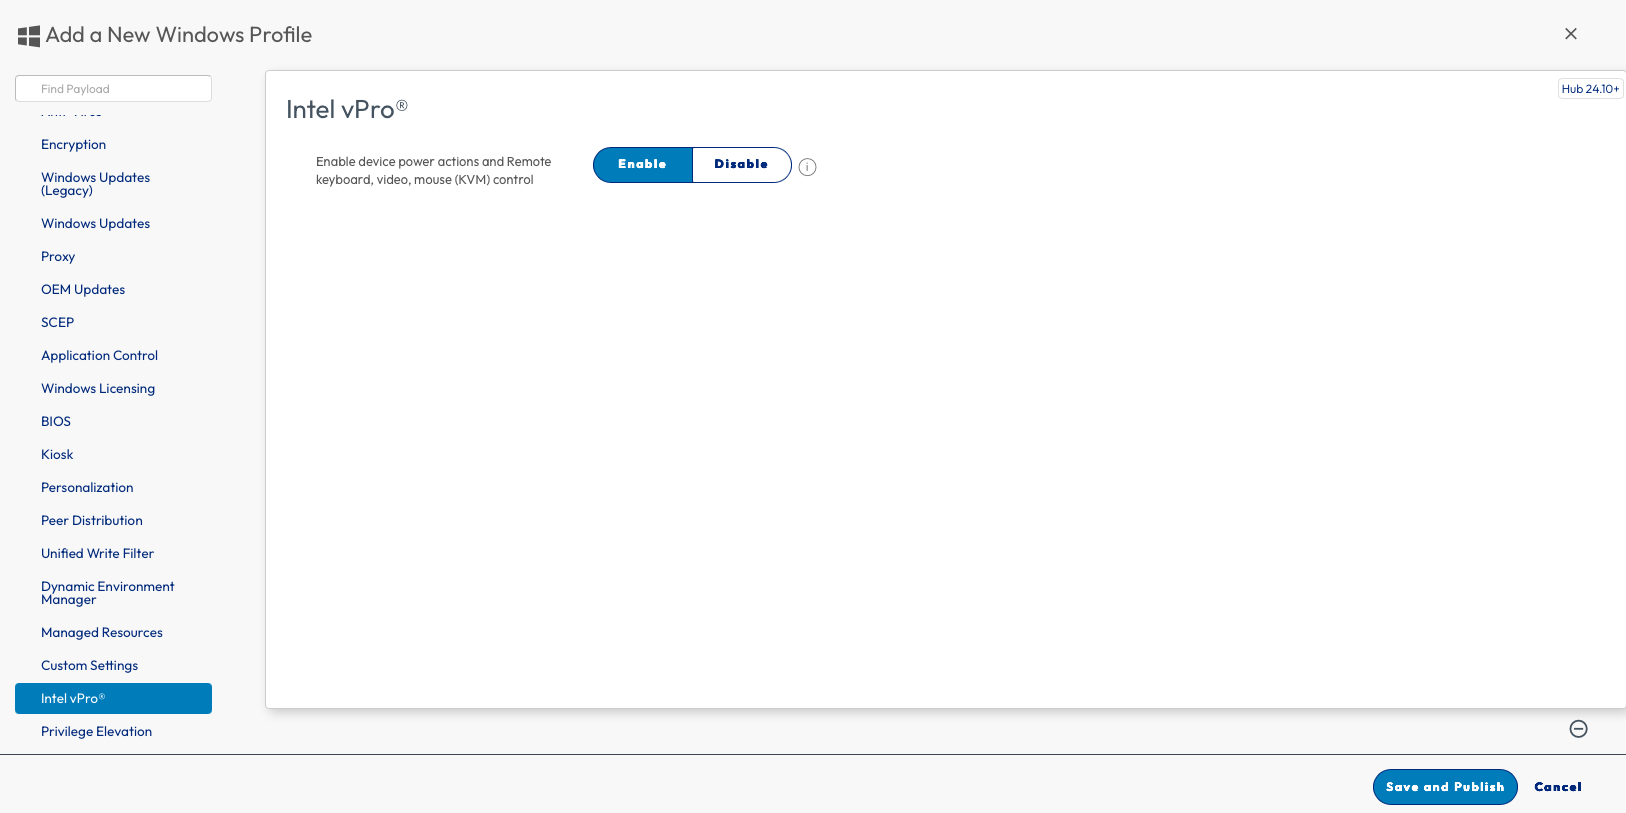
- Add the Intel vPro payload and Enable the feature
- Assign the profile to your Zoom Room devices
- Download the Intel vPro driver from intel website and deploy it with Workspace ONE
4. Conclusion
Once configured, users can simply walk into a meeting room and interact with the Zoom Rooms interface without requiring access to the underlying Windows operating system.
By combining Zoom Rooms with Workspace ONE, organisations can deliver a secure, scalable, and centrally managed meeting room experience while maintaining full visibility and control over the Windows endpoint.
Workspace ONE complements Zoom Rooms by providing enterprise-grade device provisioning, application lifecycle management, security controls, compliance monitoring, remote support, and reporting capabilities. Together, these platforms help simplify meeting room operations while ensuring devices remain secure, compliant, and easy to manage throughout their lifecycle.