Workspace ONE Launcher with CICO, MSAL & KAM

Samsung shared device use case with CICO (Check-in, Check-out), MSAL (Microsoft Authentication Library) and Knox Authentication Manager (KAM)
I was recently invited to present at a Samsung Expert training event to demonstrate how solutions from Omnissa seamlessly integrate with and enhance the capabilities of Samsung Knox. To support this presentation, I built a full demo environment showcasing how KME (Knox Mobile Enrollment), KSP (Knox Service Plugin), and KAM (Knox Authentication Manager) when combined with Workspace ONE create a powerful, end-to-end solution uniquely positioned to address frontline workforce needs.
This solution is made up of several key components, each playing a critical role in enabling secure, efficient, and scalable device operations. Once configured, workers can simply “check out” a device at the start of their shift by login in, automatically receive the apps, policies, and permissions assigned to their role. When the shift ends, “checking in” the device clears personal data and returns it to a clean, ready-for-the-next-user state. This reduces device sprawl, ensures consistent user experiences, and maintains strong data privacy.
The section below provides a high-level overview of the components making up the solutions, while the remainder of this blog will dive deeper into the configuration details.
- Identity
- On-premises Active Directory (AD) synchronised to EntraID via cloud sync
- AirWatch Cloud Connector (ACC) deployed on-premises to synchronise users to Workspace ONE UEM
- Access Cloud Connected deployed on-premises to synchronise users to Omnissa Access
- Note that SCIM 2.0 can also be configured for cloud only deployment
- Knox
- KME used to auto enrol devices to the designated Organisation Group (OG)
- KAM used to simplify login experience
- Auto populate username/password
- KSP used to pre-configure settings
- Workspace ONE
- Launcher used to create consistent experience and restrict access
- Shared device mode with CICO (Check-in/Check-out)
- Clear data and cache on logoff
- Workspace ONE UEM integrated with EntraID for device compliance and MSAL
- Omnissa Access integrated with UEM and federated with EntraID
- Workspace ONE Assist for remote view/control
- Mobile Threat Defense (not documented in this blog post)
- Activated within Hub automatically
- Phishing and Content protection enforced
- Blocking website categories such as Gambling, Violence…
- Horizon (not documented in this blog post)
- Horizon Cloud on Azure virtual desktops
- Can be used for back office tasks
- Samsung DeX for simplified access to Windows 11 from a single device
- Horizon Cloud on Azure virtual desktops
1. Knox Mobile Enrollment (KME)
Knox Mobile Enrollment (KME) is a zero-touch provisioning service that streamlines the deployment of Samsung devices at scale. It allows IT teams to automatically enrol devices into Workspace ONE the moment they’re powered on, with minimal manual setup, staging, or user intervention required.
Workspace ONE supports a number of enrolment flags in addition to what KME offers, typically used to enhance and speed up the enrolment process.
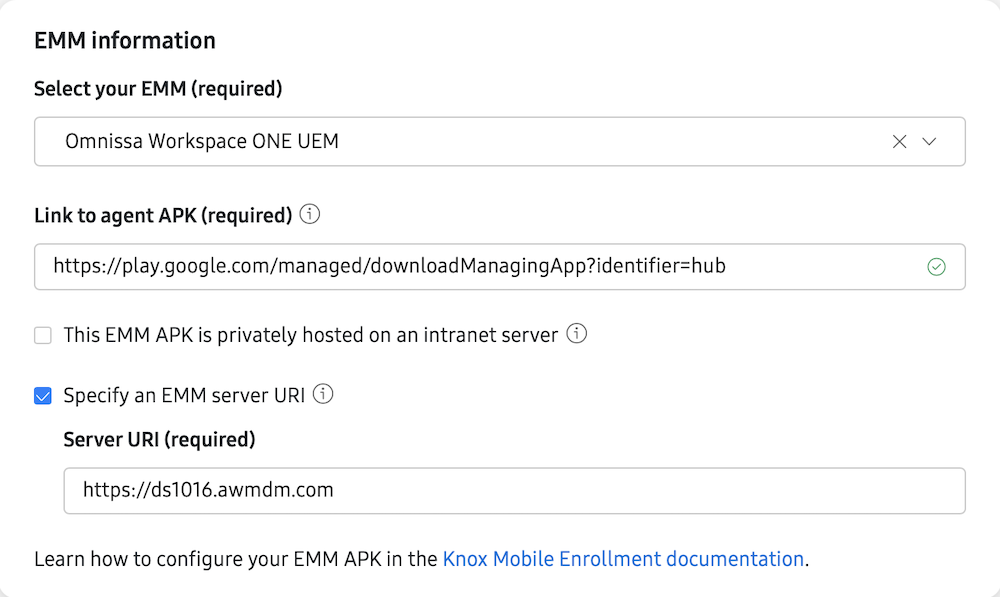
To create your KME profile, login to the Samsung Knox Admin portal, in the KME blade, select Profiles and Create profile.
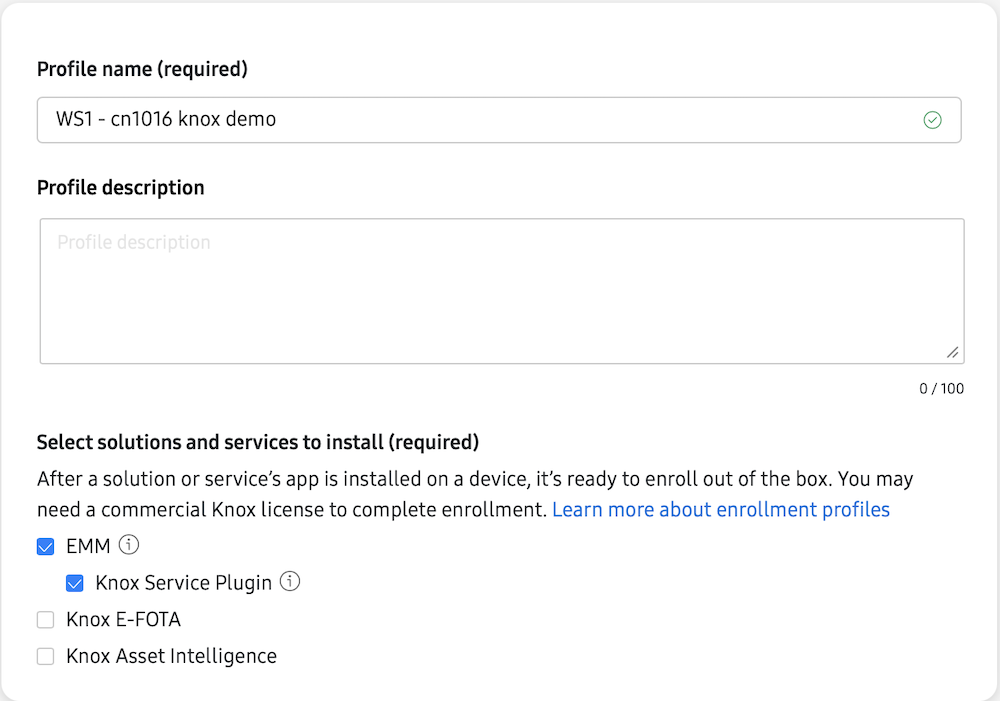
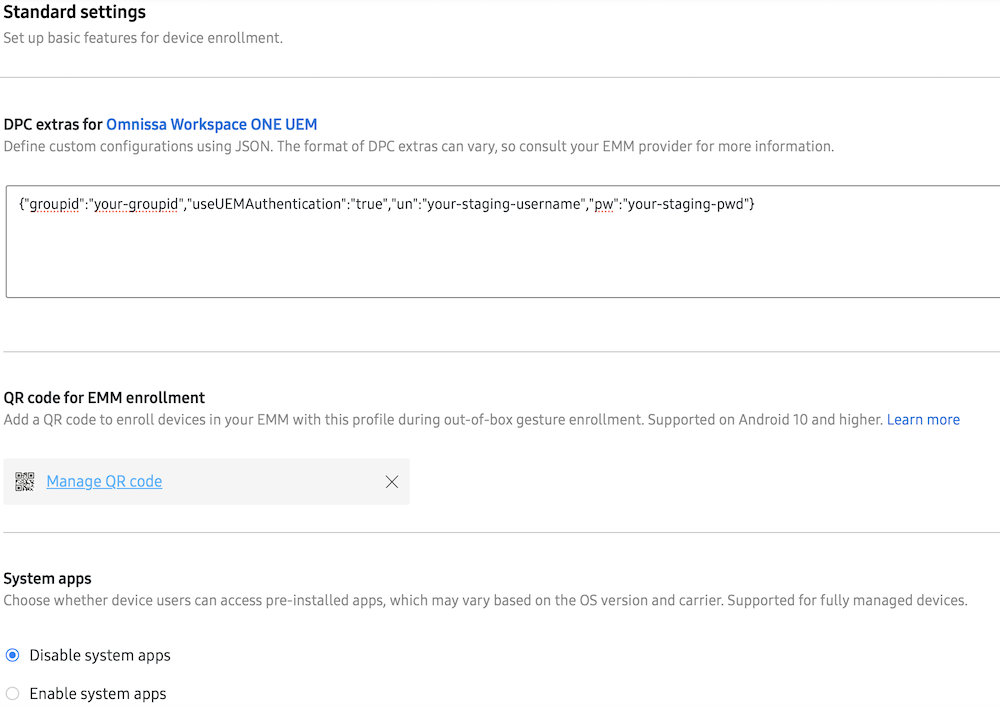
Additional flags used in the KME profile:
{"groupid":"your-groupid","useUEMAuthentication":"true","un":"your-staging-username","pw":"your-staging-pwd"}
With this configuration, the Samsung device automatically enrols into the designated OG using a multi-user staging account, and it authenticates through the Workspace ONE UEM authentication flow rather than Omnissa Access.
2. Knox Service Plugin (KSP)
Knox Service Plugin (KSP) extends the capabilities of Samsung devices by exposing the full range of advanced management APIs available within the Samsung Knox framework. Delivered as a lightweight app, KSP allows Workspace ONE to configure and enforce deep device-level policies, such as hardware restrictions, security controls, app management, and kiosk behaviours, without requiring custom integrations or complex scripting.
To create your KSP config:
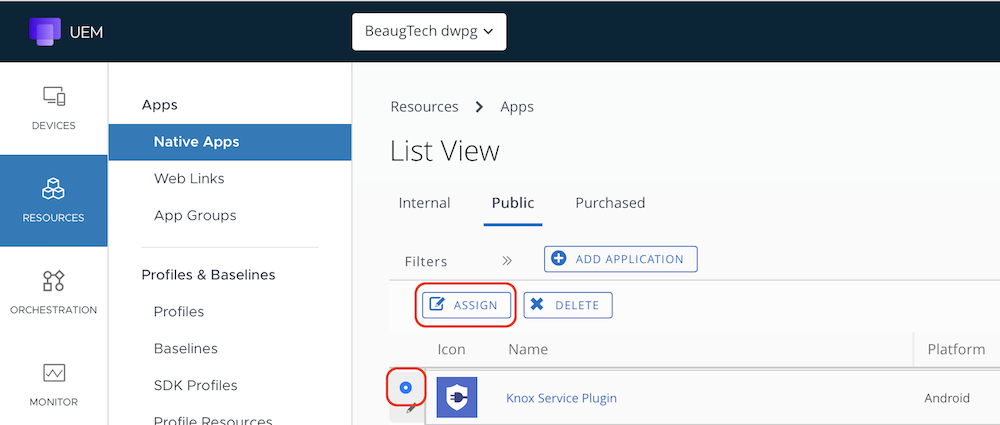
- Login to your Workspace ONE UEM console
- Go to Resources > Native Apps > Public
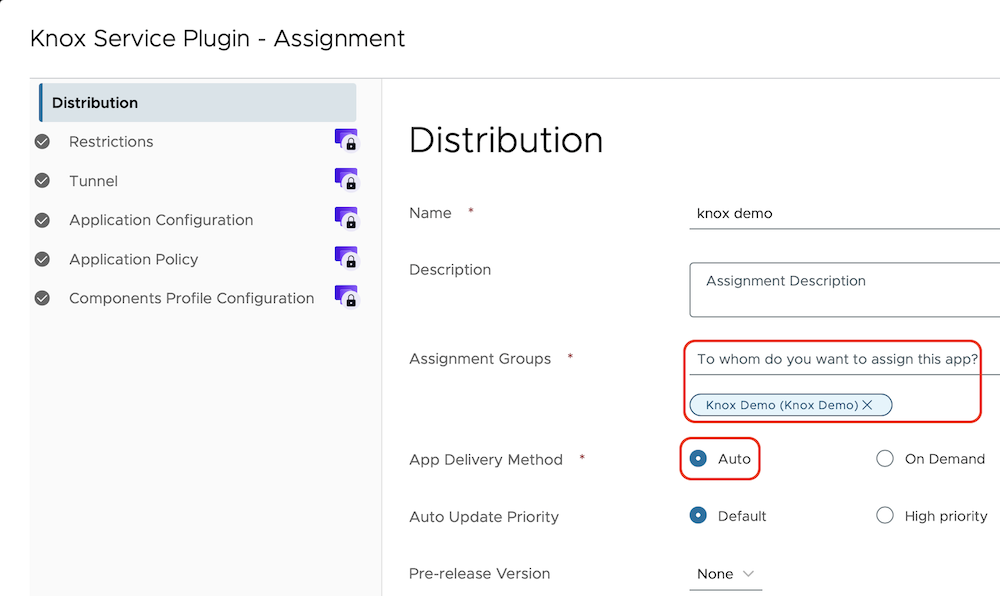
- Locate the KSP app (or import it via Google Managed Play if needed), Select it and click Assign.
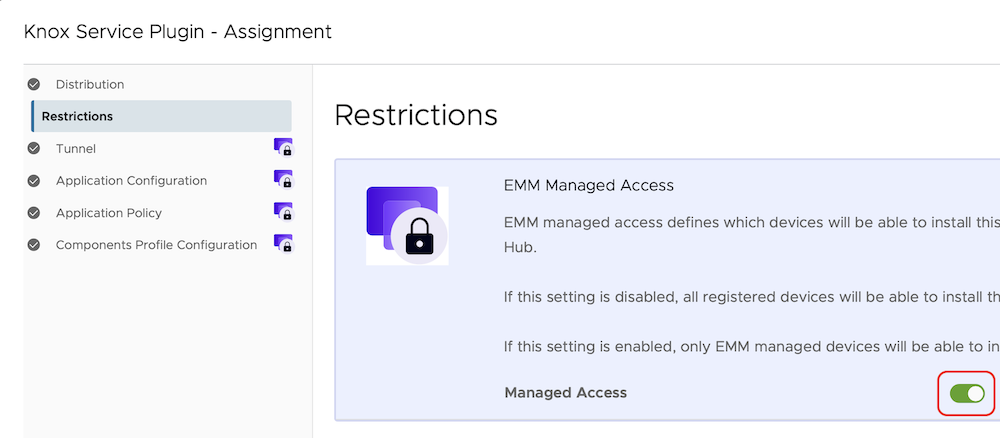
- Distribution
- Assignment Groups: select-your-smart-group
- Delivery: Auto
- Restrictions - Managed Access: Enabled
- Create an AppConfig
- Knox license: add-your-knox-license
- Device-wide policies
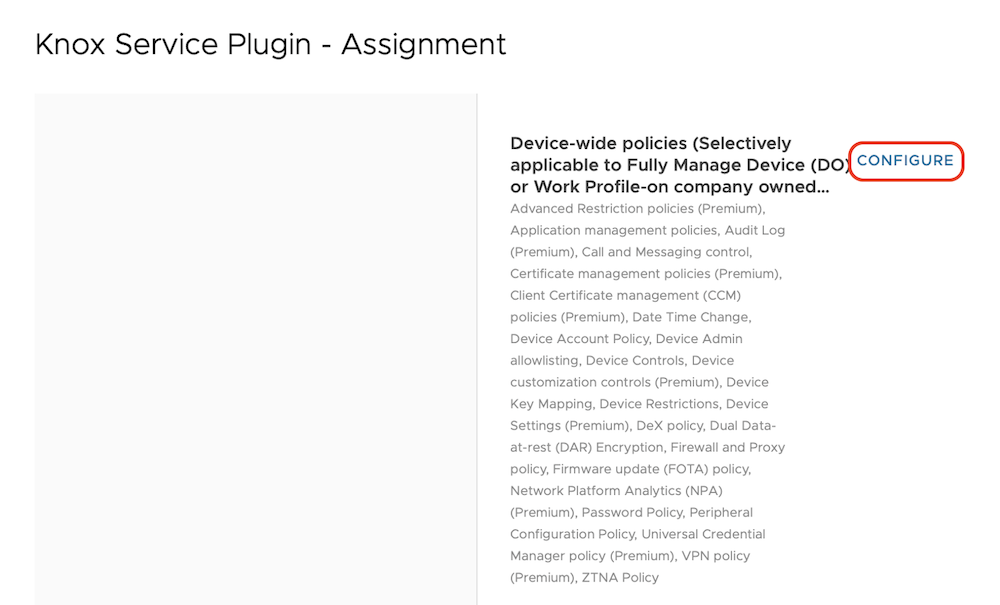
- Enable device policy controls: Enable
- Application management policies
- Enable application management controls: Enable
- Battery optimization allowlist:
com.airwatch.androidagent, com.airwatch.lockdown.launcher, com.airwatch.tunnel, com.samsung.android.knox.kam - Force Stop Blocklist:
com.samsung.android.knox.kam - Package name for auto-launch:
com.samsung.android.knox.kam/com.samsung.android.knox.kam.ui.SplashScreenActivity - Clear Cache Block List:
com.samsung.android.knox.kam, com.samsung.android.knox.kpu - Clear Data Block List:
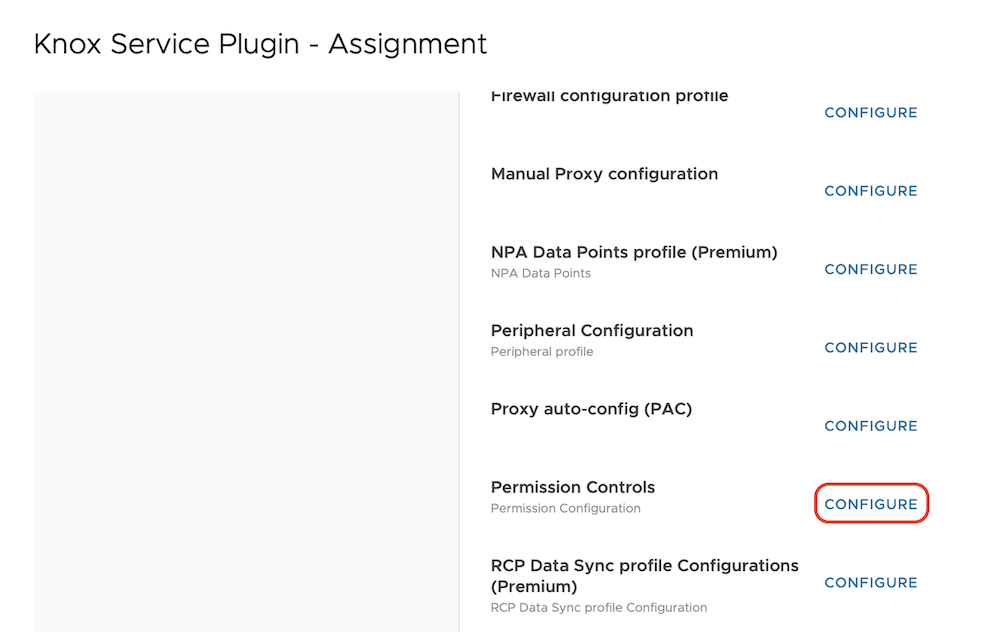
com.samsung.android.knox.kam, com.samsung.android.knox.kpu - Enable Permission controls: Enable
- Permission Controls
- Permission Policy: ALL, Package:
com.airwatch.lockdown.launcher/com.airwatch.lockdown.launcher - Permission Policy: ALL, Package:
com.airwatch.androidagent/com.airwatch.androidagent - Permission Policy: ALL, Package:
com.airwatch.tunnel/com.airwatch.tunnel - Permission Policy: ALL, Package:
com.airwatch.contentlocker/com.airwatch.contentlocker - Permission Policy: ALL, Package:
com.airwatch.rm.agent.cloud/com.airwatch.rm.agent.cloud
- Knox license: add-your-knox-license
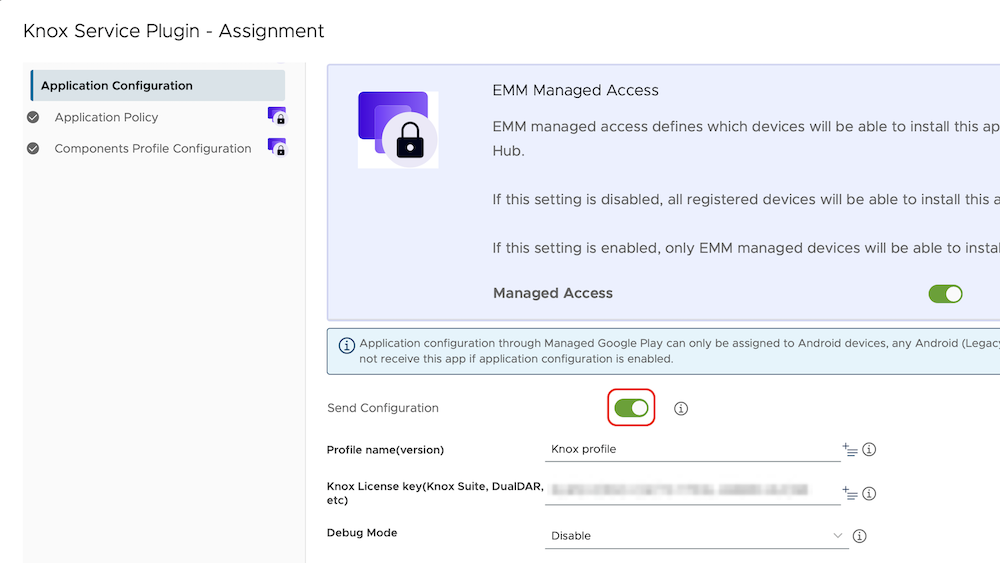
With this configuration in place, KSP ensures that KAM remains running at all times and that its app data is preserved during the check-in (log-off) process. It also prevents essential system applications from being put to sleep by Android’s battery optimisation features, maintaining a consistent and reliable user experience. Finally, it pre-configures required app permissions, reducing unnecessary notification prompts during device staging and speeding up the overall provisioning workflow.
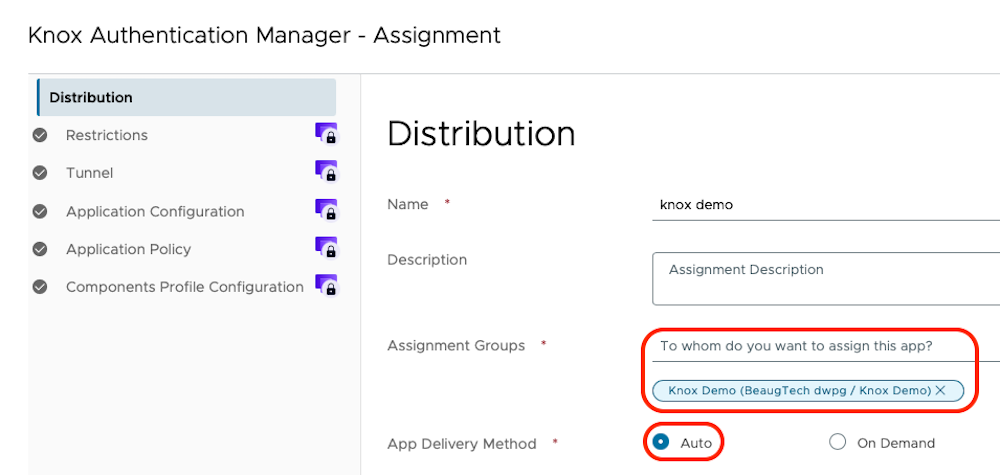
3. Knox Authentication Manager (KAM)
Knox Authentication Manager (KAM) is a managed, Android autofill service for shared, fully managed Samsung devices. Knox Authentication Manager offers multi-user facial biometrics to speed-up shared device sign-ins, eliminates authentication friction by saving and automatically filling user credentials for any productivity app that requires manual sign-in, and securely syncs users’ profiles across shared devices.
To create your KAM config:
- Login to your Workspace ONE UEM console
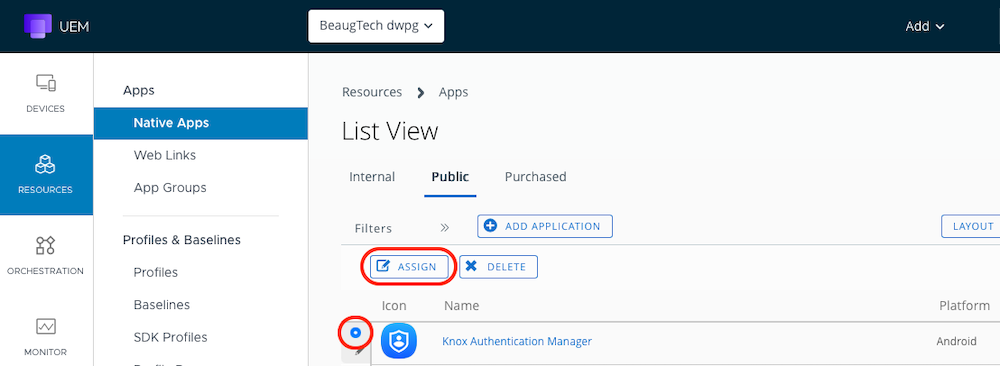
- Go to Resources > Native Apps > Public
- Locate the KAM app (or import it via Google Managed Play if needed), Select it and click Assign.
- Distribution
- Assignment Groups: select-your-smart-group
- Delivery: Auto
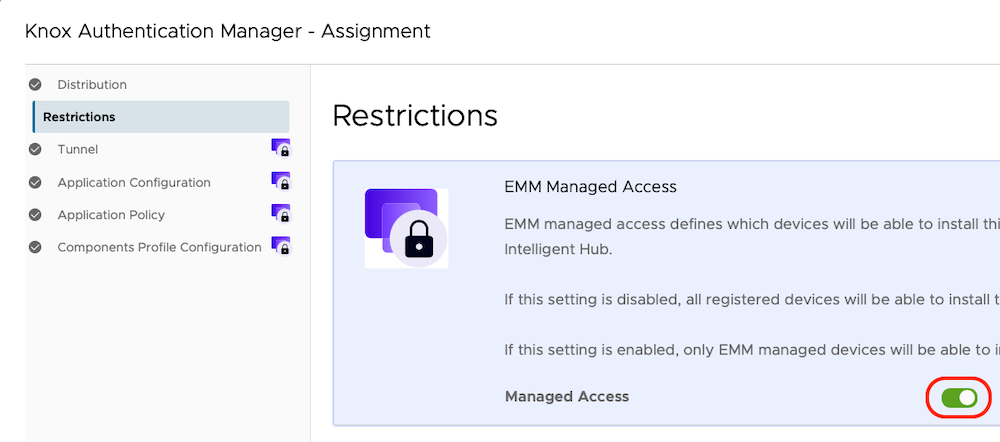
- Restrictions - Managed Access: Enabled
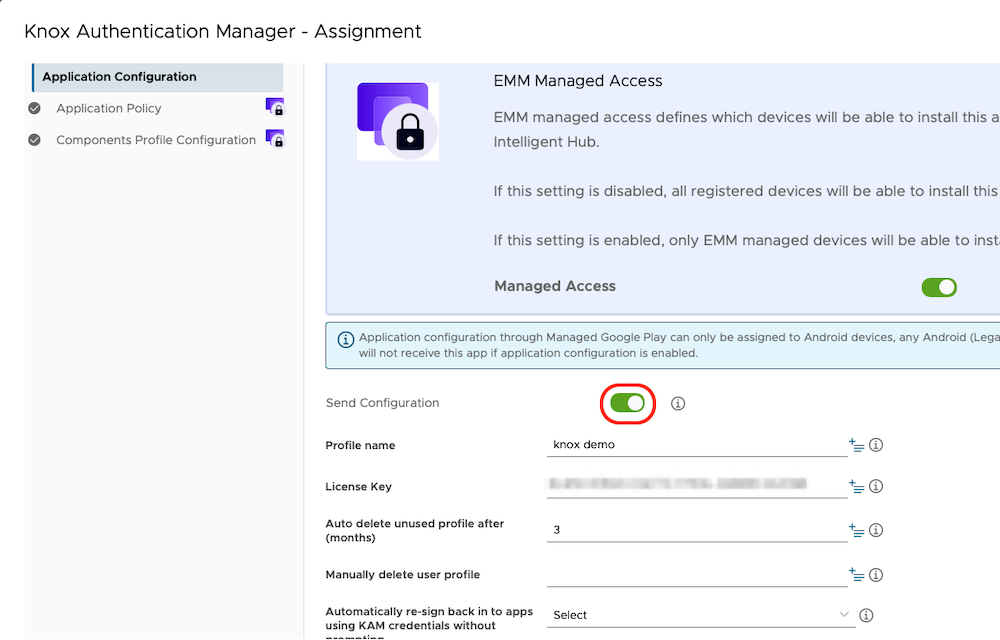
- Create an AppConfig
- Knox license: add-your-knox-license
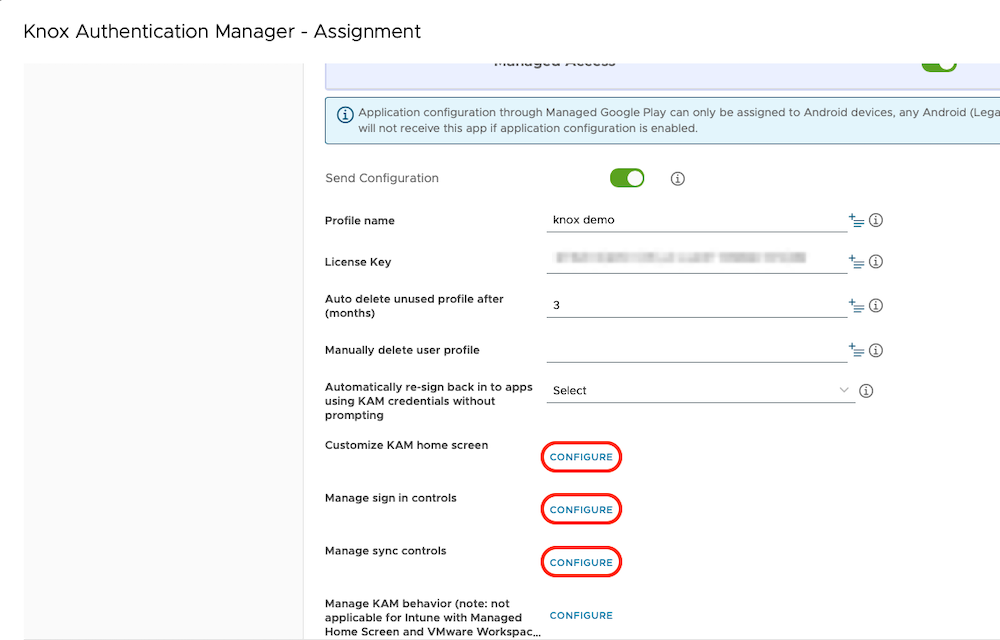
- Customize KAM home screen
- Title: add-your-company-name
- Description: add-a-description
- Show device Serial: Enable
- Admin PIN: create-an-admin-pin
- Manage sign in controls
- UEM being used: Omnissa Workspace ONE with launcher sign in screen
- Main sign in method: PIN+Face
- Notice description: Yes
- PIN Length: select-your-pin-length
- Manage sync controls
- Enable syncing: Enable
- Sync Org ID: add-your-company-name
- Sync devices by: Group ID
- Sync Group ID: create-a-groupid
- Sync Group Key: create-an-encryption-key
- To create the encryption key, run the following command on your computer:
openssl rand -base64 24
- To create the encryption key, run the following command on your computer:
- Sync send UDP port:
49158 - Sync receive UDP port:
49159 - Sync TCP port:
7788 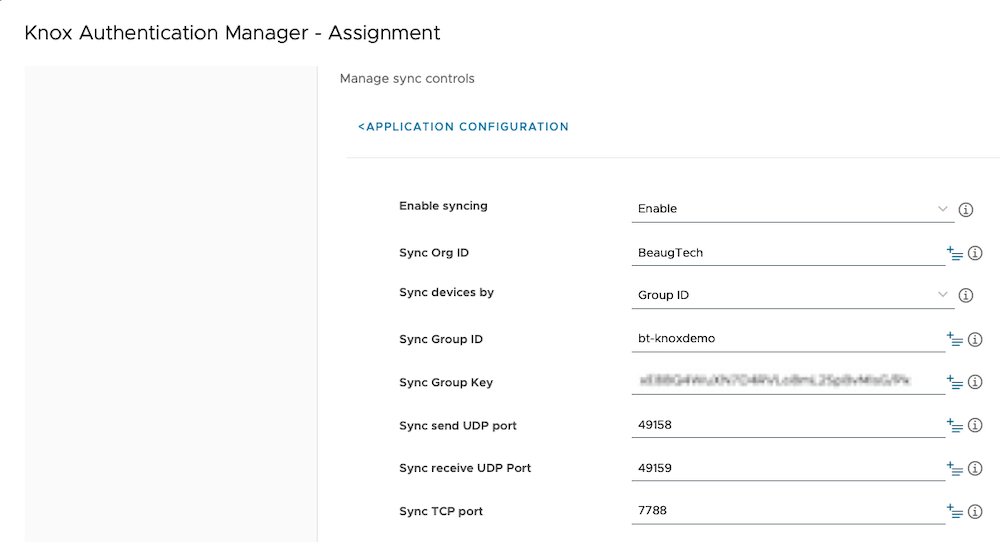
- Manage KAM behavior
- Leave un-configured
- Knox license: add-your-knox-license
4. The Microsoft Authentication Library (MSAL)
The Microsoft Authentication Library (MSAL) is a modern authentication framework developed by Microsoft that enables apps to securely sign in users. By enabling Microsoft SSO for shared Android devices, your shift workers can seamlessly sign into mobile applications when they check-out (sign-in) a shared device. This feature enables single sign-on into:
- Many first-party Microsoft apps, such as Microsoft Teams.
- A list of first-party Microsoft apps that support this mode of single sign-on can be found here.
- Any other application that supports Microsoft’s shared device mode using the Microsoft Authentication Library (MSAL).
4.1 Configure Microsoft SSO
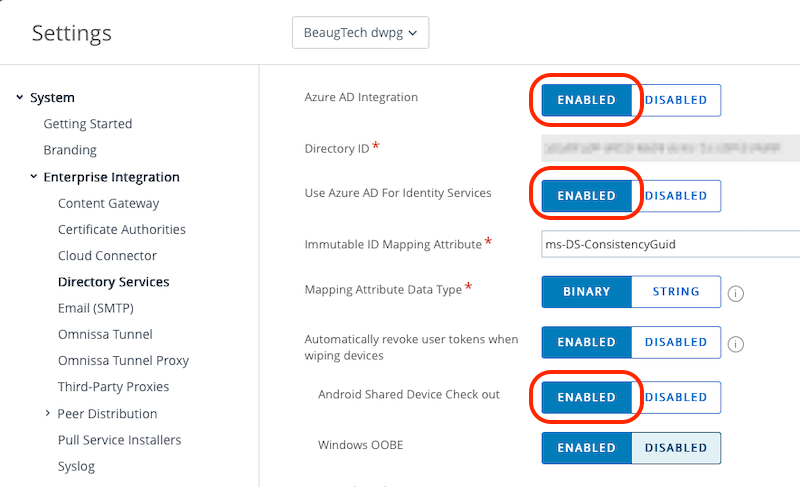
To configure Microsoft SSO, login to your Workspace ONE UEM console, go to Groups & Settings > All Settings > System > Enterprise Integration > Directory Services.
- Azure AD Integration: Enabled
- Directory ID: add-your-entraid-tenantid
- Azure AD for Identity Services: Enabled
- ms-DS-ConsistencyGuid:
ms-DS-ConsistencyGuid - Mapping Attribute Data Type: Binary
- Automatically revoke user tokens when wiping devices: Enabled
- Android Shared Device Checkout: Enabled
- You will be redirected to Microsoft Entra. Log in with an administrator account for your Microsoft Entra tenant and authorise Workspace ONE UEM to obtain information about your directory users.
- Confirm that Workspace ONE UEM MSAL SSO is listed in Entra ID Console > Enterprise Applications
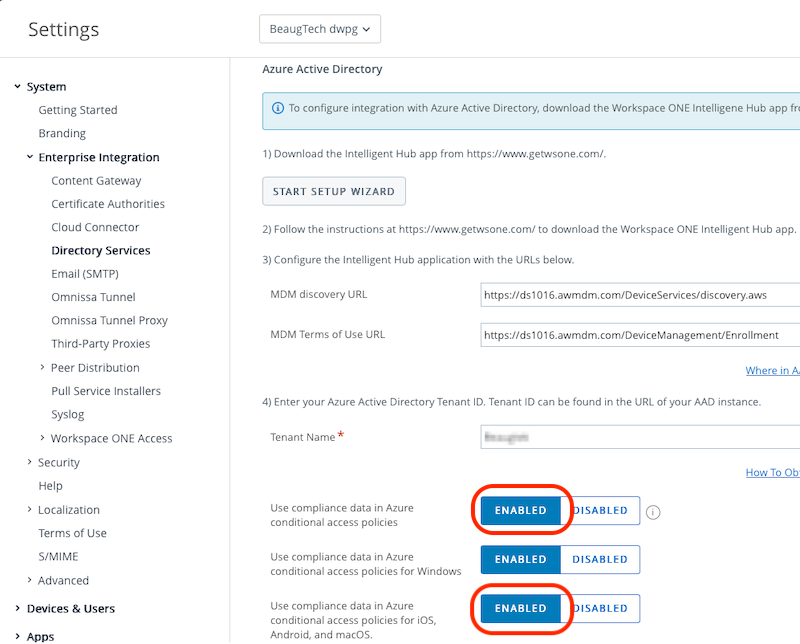
- Azure Active Directory
- Tenant Name: add-your-entraid-tenantname
- Use compliance data in Azure conditional access policies: Enabled
- Use compliance data in Azure conditional access policies for iOS, Android, and macOS: Enabled
- Perform a Sync
4.1.1 Additional steps for hybrid setup
The following steps are only required if your have synchronised your users from on-premises Active Directory to Workspace ONE UEM via AirWatch Cloud Connector (ie. Your are not using Omnissa Identiy Services).
Login to your Workspace ONE UEM console, go to Groups & Settings > All Settings > System > Enterprise Integration > Directory Services > Users tab. Under Advanced select Sync Attributes. This will pull the Immutable ID for users into Workspace ONE UEM.
Then login to Microsoft Entra admin center, go to Enterprise Applications and select Workspace ONE UEM MSAL SSO.
- Open the Single sign-on menu
- Select Edit next to Attributes & Claims
- Select Add New Claim
- Name:
on-premises-immutable-id - Source: Attribute
- Source attribute:
user.onpremisesimmutableid 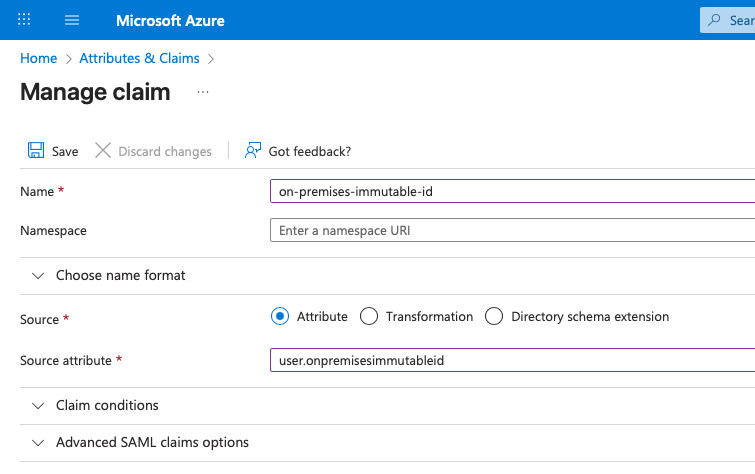
- Name:
Next, you’ll need to create a signing key to securely issue the custom claim (Immutable ID). This signing key is made up of three components, a public key file, a private key file, and the password used to decrypt that private key. To generate the certificate, download the PowerShell script provided by Omnissa called: Set Custom Signing Key - Microsoft SSO.
Run the below PowerShell script, and replace the placeholder attributes with your tenant details.
./setCustomSigningKey.ps1 -CertFriendlyName "create-cert-friendlyname" -Password "create-a-pwd" -TenantId "add-your-entraid-tenantid" -ApplicationObjectId "msal-app-object-id" -SelfSigned “Y”
Tip: The script provided seem to only works on Windows, so if you are using macOS or Linux, make sure to run this script from a Windows VM.
Once completed, the script will generate two certificate files (.cer and .pfx). Keep them in a safe place in case you need them in future. Note that the signing certifcate is only valid for 1 year, so you will need to renew it before its expiration .
4.2 Microsoft Authenticator
When configured in shared device mode, Microsoft Authenticator enables a secure and streamlined sign-in experience on devices used by multiple frontline workers. Instead of treating the device as personally owned, shared mode binds the authentication flow to a single, shift-based user session.
To create your MS Authenticator shared device mode config:
- Login to your Workspace ONE UEM console
- Go to Resources > Native Apps > Public.
- Locate the MS Authenticator app (or import it via Google Managed Play if needed), Select it and click Assign.
- Distribution
- Assignment Groups: select-your-smart-group
- Delivery: Auto
- Restrictions - Managed Access: Enabled
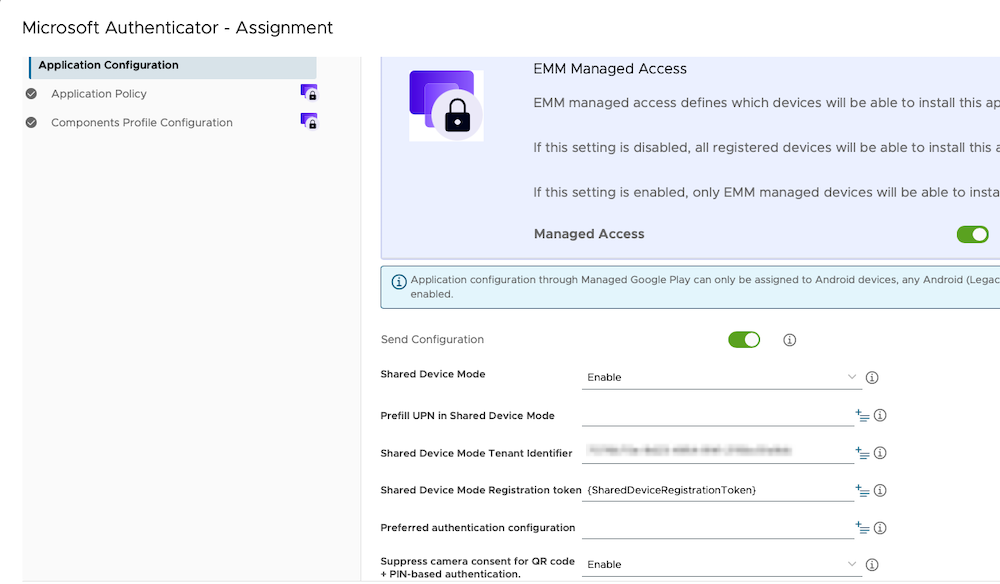
- Create an AppConfig
- Shared Device Mode: Enable
- Prefill UPN in Shared Device Mode: Leave this field blank
- Shared Device Mode Tenant Identifier: add-your-entraid-tenantid
- Shared Device Mode Registration token:
{SharedDeviceRegistrationToken} - Suppress camera consent for QR code: Enable
Tip: If you are using an Android Restrictions profile, ensure the setting Allow adding/deleting accounts is set to Enable.
4.3 Intelligent Hub settings
The last configuration item for the MSAL integration is to configure Intelligent Hub to support it.
- Login to your Workspace ONE UEM console
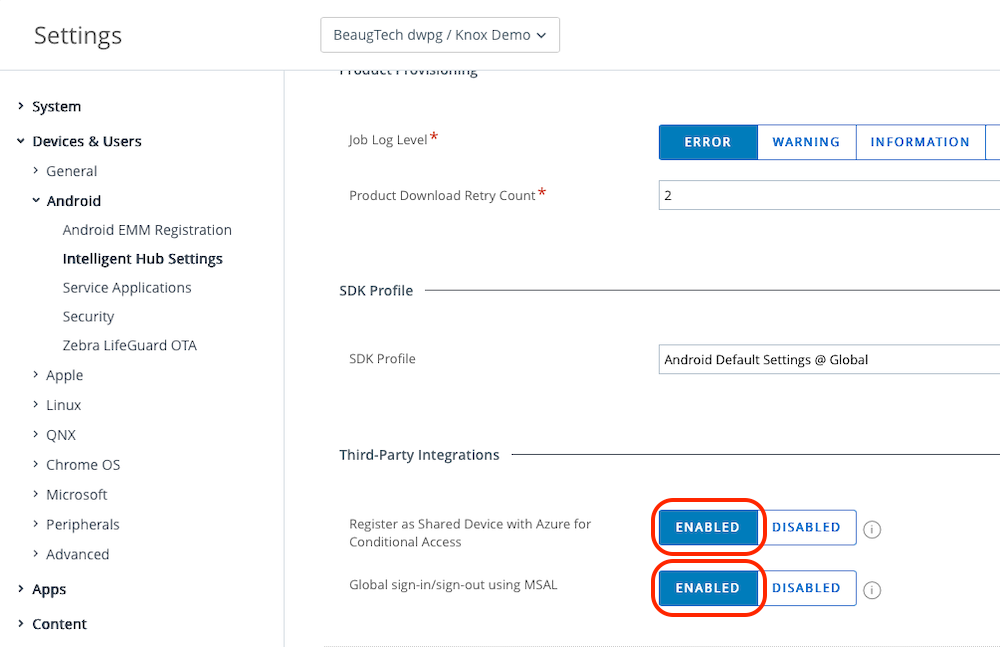
- Go to Groups & Settings > All Settings > Devices & Users > Android > Intelligent Hub Settings.
- Register as Shared Device with Azure for Conditional Access: Enabled
- Global sign-in/sign-out using MSAL: Enabled
5. Workspace ONE UEM
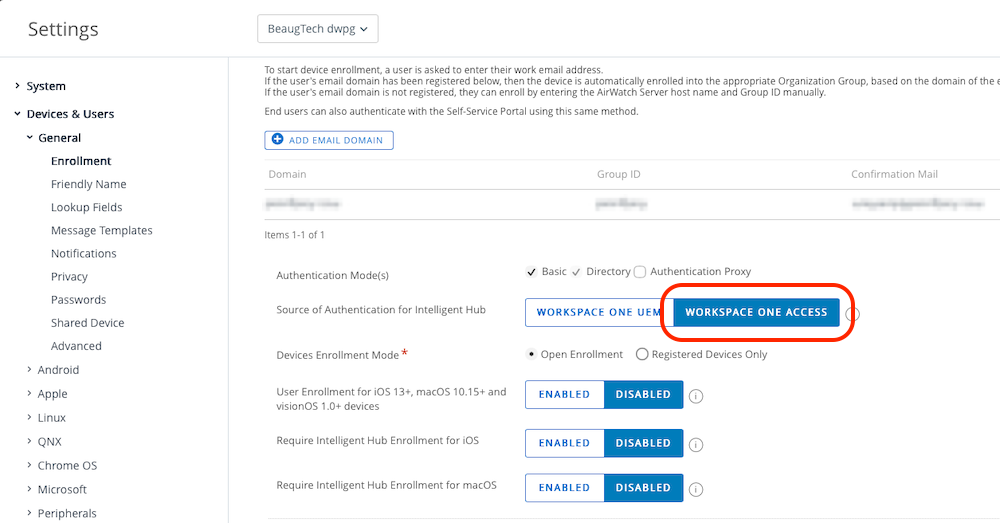
5.1 Authentication settings
Workspace ONE UEM supports several authentication workflows. In this setup, I’ve configured Workspace ONE UEM to use Omnissa Access as the authentication source. This in turn allows for Workspace ONE Launcher to use SAML for authentication instead of Active Directory. Omnissa Access is then federated with EntraID, so any authentication for device enrolment or Intelligent Hub will leverage EntraID conditional access policies.
Also you need to make sure that your Google integration is set to:
- Management Mode: Work Managed
- Account Generation: Device-Based
- Management Source: Custom DPC
| EMM Registration | Enrollment |
|---|---|
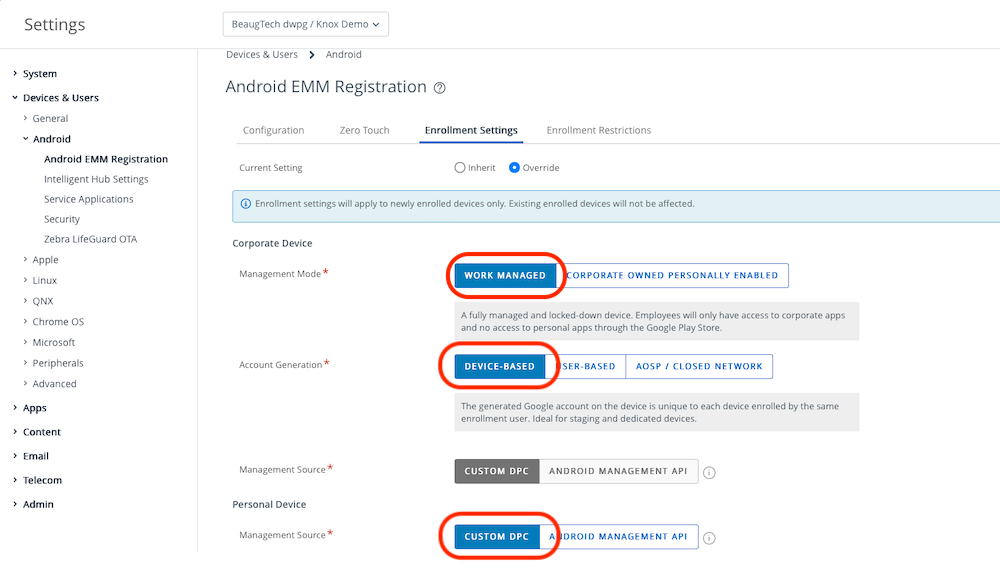 |
 |
5.2 Multi-user staging account
Workspace ONE UEM supports several staging workflows. In this setup, I’ve configured a multi-user staging account so that each device only needs to be staged once. Thereafter, frontline workers simply sign in at the start of their shift and sign out when they finish. At logoff, user specific data is cleared and the device returns to its clean, staged state, ready for the next worker.
To configure a mutli-user staging account
- Login to your Workspace ONE UEM console
- Go to Accounts > Users
- Click Add User.
- Complete the necessary fields
- This staging account could either be a Directory or Basic account
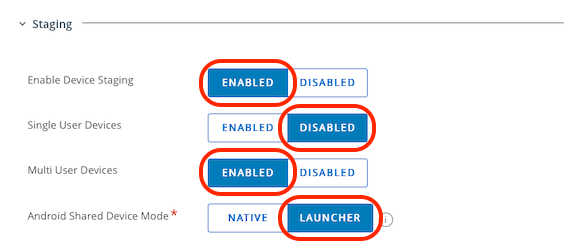
- In the Advanced tab, expand the Staging section
- Enable Device Staging: Enabled
- Single User Devices: Disabled
- Multi User Devices: Enabled
- Android Shared Device Mode: Launcher
5.3 Shared device settings
Next you need to ensure that the shared device settings in Workspace ONE UEM are configured to align with your use case. In this setup I’ve configured the shared device settings as per below.
| Grouping | Logout |
|---|---|
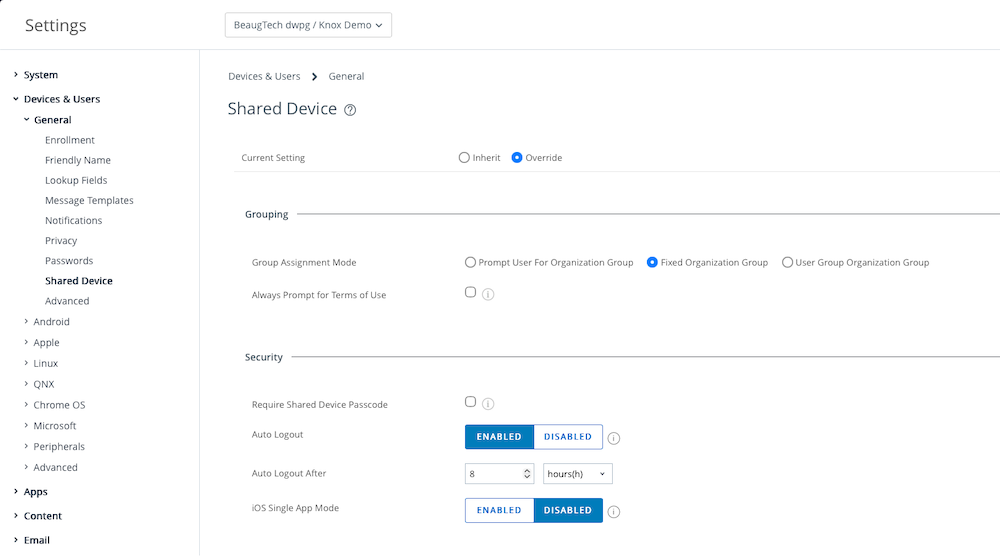 |
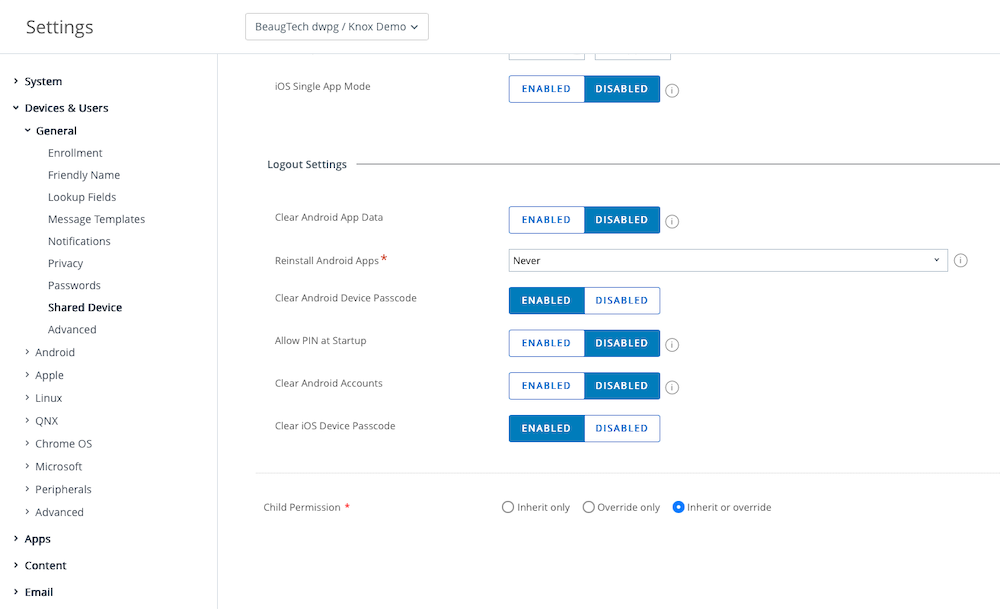 |
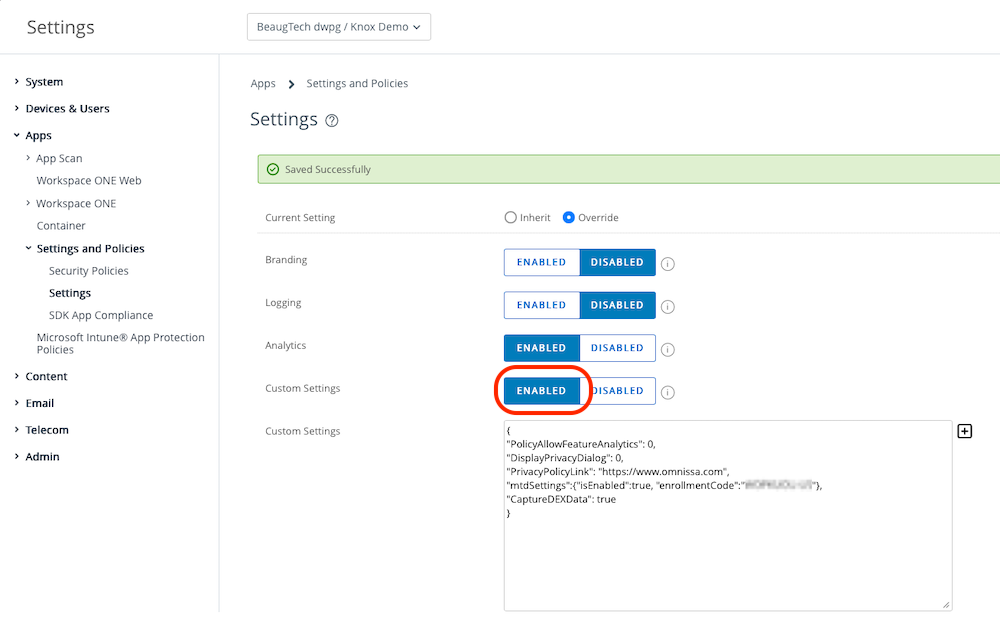
5.4 Intelligent Hub SDK
If you want to enhance the user experience and remove the welcome and privacy sreens when signing into Hub or any Workspace ONE SDK enabled apps, I recommend using the below custom SDK settings.
- Login to your Workspace ONE UEM console
- Go to Groups & Settings > All Settings > Apps > Settings and Policies > Settings
- Custom Settings: Enabled
- Paste the below json code
{
"PolicyAllowFeatureAnalytics": 0,
"DisplayPrivacyDialog": 0,
"PrivacyPolicyLink": "https://www.omnissa.com",
"mtdSettings":{"isEntitled":true},
"CaptureDEXData": true
}
Tip: Only use mtdSettings and CaptureDexData if you are licensed for those add-ons.
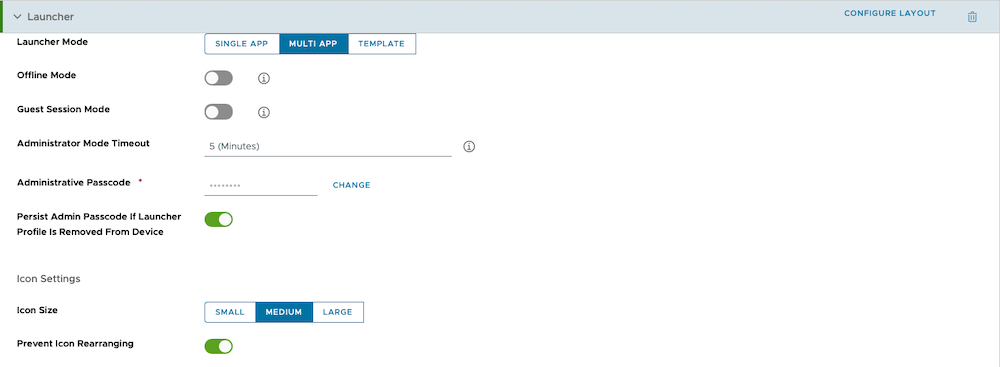
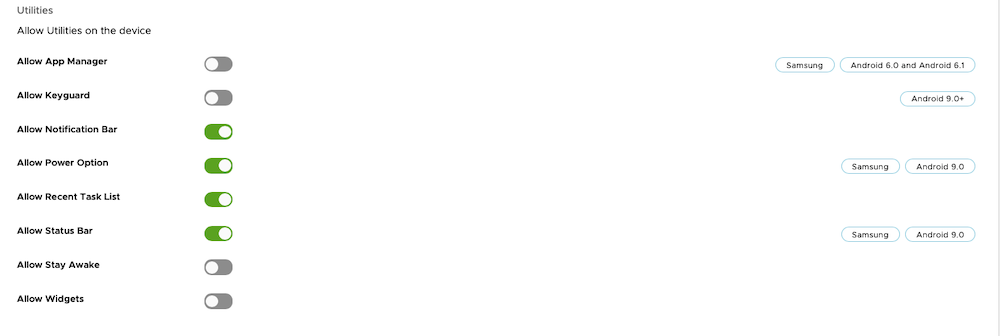
5.5 Workspace ONE Launcher
Now onto the last piece of the puzzle, configuring Workspace ONE Launcher to customise the device layout.
Workspace ONE Launcher is a customisable Android home screen to give organisations tighter control over corporate and frontline devices. By replacing the standard Android launcher, it allows IT teams to present only approved apps, apply kiosk settings, and lock down system settings to ensure a secure, task-focused environment. This creates a simpler experience for workers, reduces distractions, strengthens security, and ensures devices stay consistent and compliant. With flexible branding options Launcher is an ideal solution for retail, logistics, field services, and any scenario where devices need to stay focused, secure, and easy to use.
To create a Launcher profile:
- Login to your Workspace ONE UEM console
- Go to Resources > Profiles & Baselines > Profiles
- Click Add and Add Profile.
- Platform: Android
- Management Type: Custom DPC
- Profile Name: create-profile-name
- Scroll down the list and ADD the Launcher payload
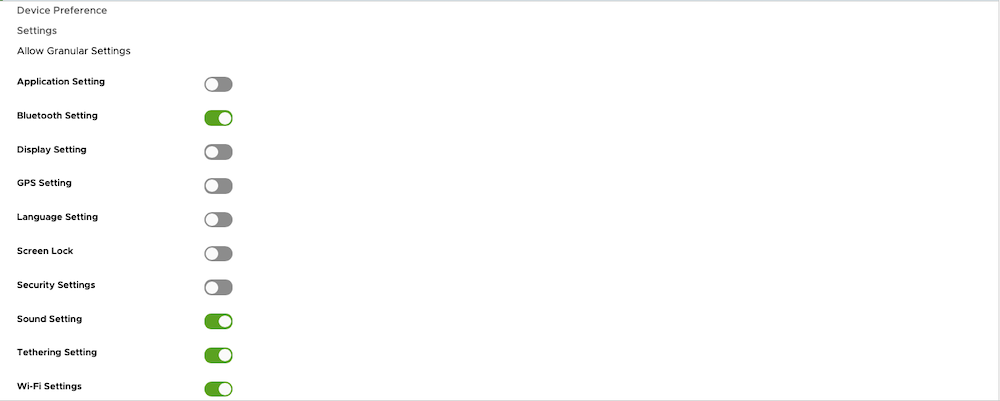
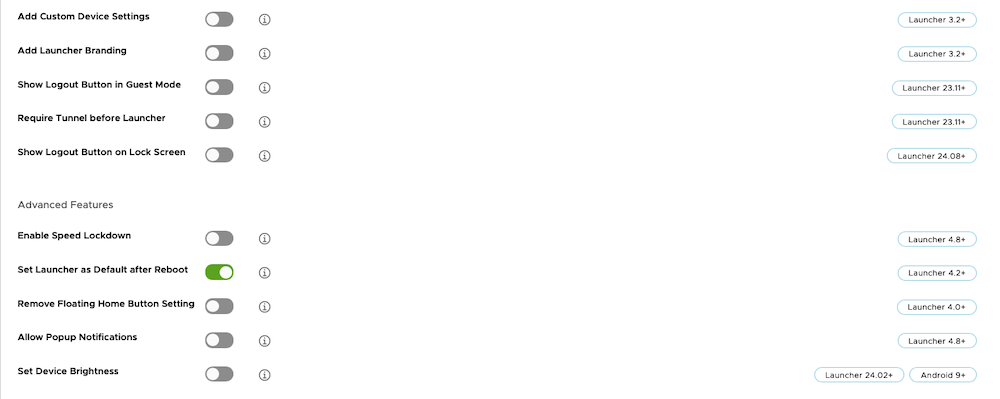
- Configure the settings as per your use case requirements
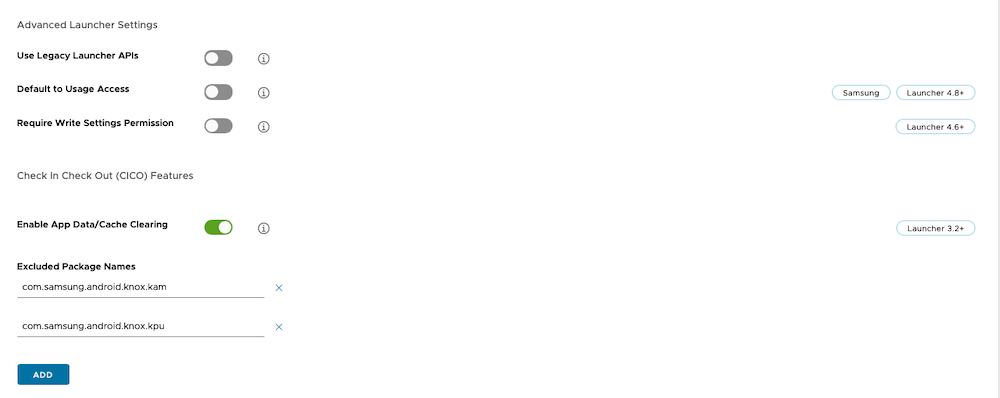
- KAM requirements:
- Enable App Data/Cache Clearing: Enable
- Excluded Package Names
com.samsung.android.knox.kamcom.samsung.android.knox.kpu
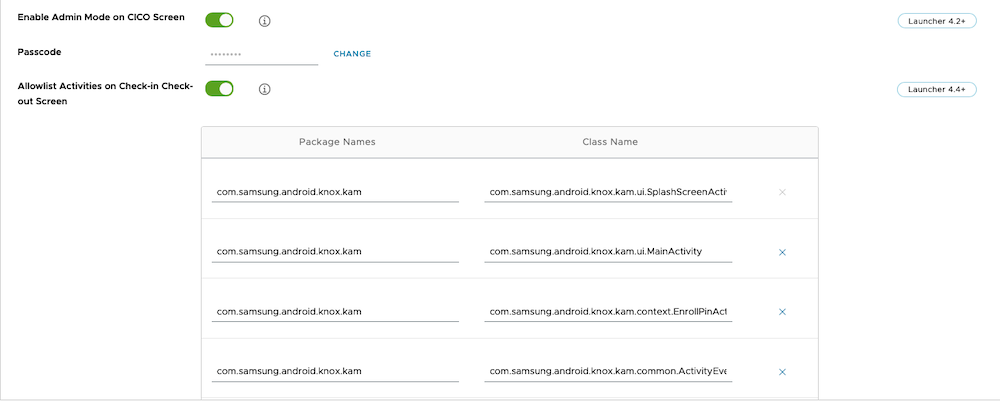
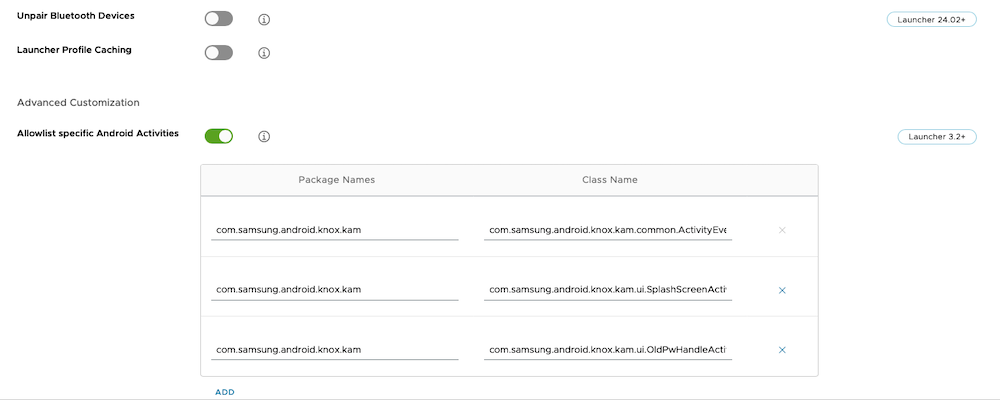
- Allowlist Activities on Check-in Check-out Screen: Enable
- Provide the KAM Package Names and Class Name as per KAM documentation
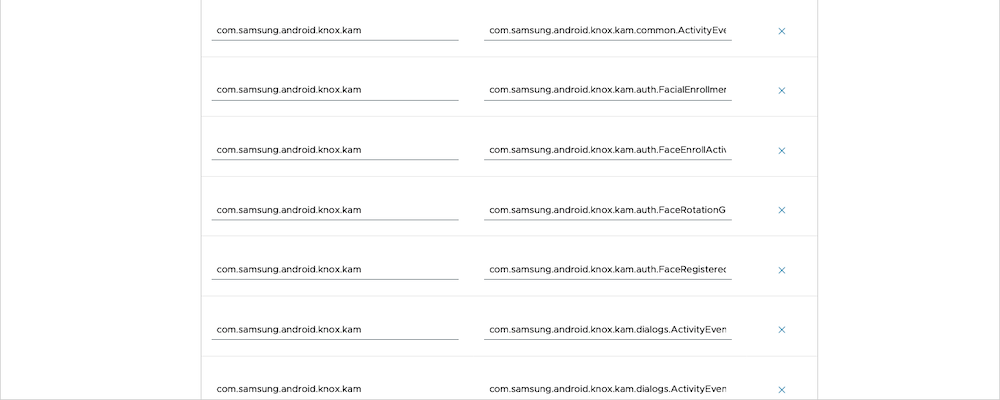
- Allowlist specific Android Activities: Enable
- Provide the KAM Package Names and Class Name as per KAM documentation
- KAM requirements:
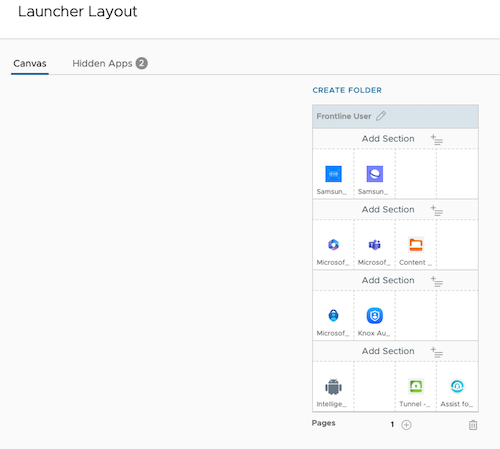
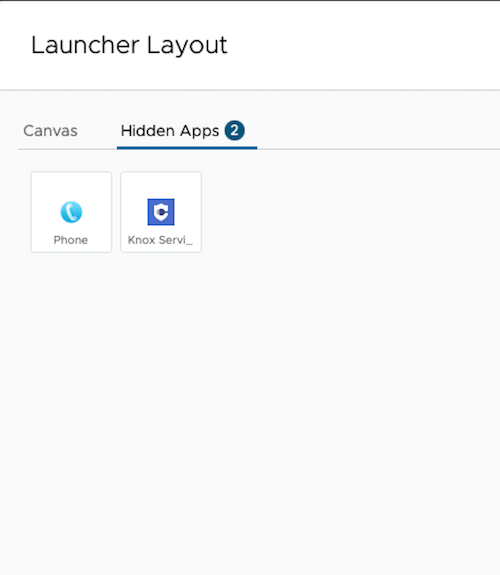
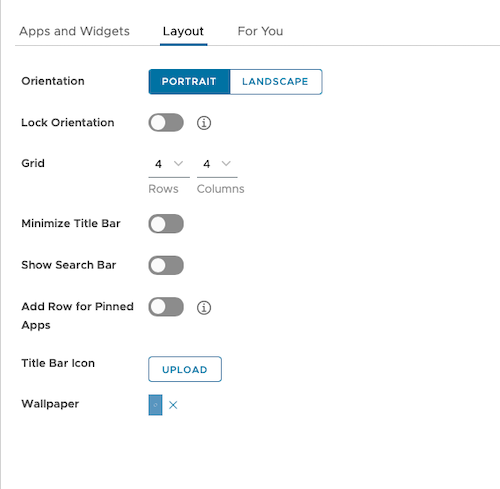
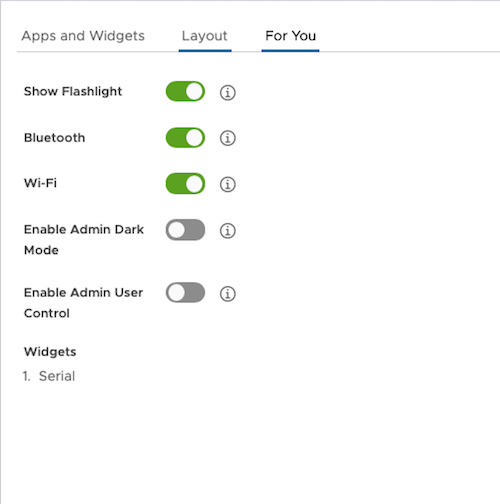
- Click on Configure Layout
- Customise the device layout as per your use case requirements
| Launcher config 1 | Launcher config 2 | Launcher config 3 | Launcher config 4 |
|---|---|---|---|
 |
 |
 |
 |
| Launcher config 5 | Launcher config 6 | Launcher config 7 | Launcher config 8 |
|---|---|---|---|
 |
 |
 |
 |
| Launcher canvas | Launcher hidden apps | Launcher layout | Launcher for you |
|---|---|---|---|
 |
 |
 |
 |